· 4 min read
Saurav Gopinath Panda

As a fast-growing tech company, we recently found ourselves inundated with a staggering number of applications for a QA Engineer position. Within just 60 hours, we received an overwhelming 180 applications, making the task of manually reviewing each one a daunting challenge. Faced with this predicament, we turned to the power of Large Language Models (LLMs) to help us efficiently evaluate the candidates and identify the most promising ones.

The Challenge: Reviewing 180 Applications in a Timely Manner

With such a large influx of applications in a short span of time, our small team quickly realized that manually reviewing each one would be an extremely time-consuming and arduous task. We needed a more efficient solution that could help us streamline the evaluation process without compromising the quality of our candidate assessment.

The Solution: AI-Powered Application Reviewer

To tackle this challenge, we developed an AI-powered application reviewer that leveraged the capabilities of the Mistral AI model. This tool was designed to analyze candidate responses, provide insights, ratings, and recommendations for each applicant, enabling us to quickly identify the most qualified candidates.

Checkout the Github: https://github.com/sauravpanda/applicant-screening

How It Works

  1. Data Preparation: We compiled all the applicant data into a CSV file, ensuring it was ready for processing.

  2. AI Model Integration: Our script utilized the Mistral AI model to analyze each candidate's responses, considering various factors such as their qualifications, experience, and problem-solving abilities.

  3. Customizable Evaluation Criteria: We defined specific evaluation criteria based on the requirements of the QA Engineer role, ensuring that the AI model focused on the most relevant aspects of each application.

  4. Automated Processing: The script processed each application using the Mistral AI model, generating feedback, reviews, interview recommendations, and ratings for each candidate.

  5. Progress Tracking: To monitor the progress of the evaluation process, we integrated the tqdm library, providing us with a visual representation of the task's completion.

  6. Results Consolidation: Finally, the script saved the processed data, including the AI-generated feedback and recommendations, into a new CSV file for our team's review.

  7. Execution Steps:

    • Clone the repository: git clone https://github.com/sauravpanda/applicant-screening.git
    • Install the required packages: pip install pandas litellm tqdm kaizen
    • Update the job post description in jobpost.py.
    • Modify the CONDITIONS variable in the script to set specific evaluation criteria.
    • Prepare your CSV file with applicant data.
    • Run the script: python main.py
    • When prompted, enter the name of your CSV file (with or without the .csv extension).

The script will process the applications and save the results in a new CSV file prefixed with "updated_". Additionally, it will provide a summary of the processing, including the number of applicants processed and token usage statistics.

The Impact: Efficient Candidate Evaluation and Time Savings

By leveraging the power of AI, we were able to significantly streamline the candidate evaluation process. Instead of spending countless hours manually reviewing each application, our AI-powered tool allowed us to quickly identify the top 20 candidates we were interested in, based on the AI's recommendations and ratings.

This innovative approach saved us a tremendous amount of time and enabled us to evaluate candidates more objectively and consistently. The AI model's ability to analyze responses and provide insights helped us assess candidates on different subjective criteria, ensuring a fair and comprehensive evaluation process.

Moving Forward: Embracing AI in Hiring Processes

The success of our AI-powered application reviewer has highlighted the immense potential of integrating AI technologies into hiring processes. As we continue to grow and attract a larger pool of applicants, we plan to further refine and expand our AI-driven approach, ensuring that we can consistently identify top talent while maintaining efficiency and objectivity.

By embracing the power of AI, we are not only streamlining our hiring processes but also positioning ourselves as an innovative and forward-thinking company that values technological advancements and their practical applications.

· 6 min read
Shreyash Gupta

Introduction

Starting from February 1, 2024, Amazon Web Services (AWS) has announced that it will introduce charges for IPv4 addresses ($0.005 per IP per hour for all public IPv4 addresses), which is a clear signal of the growing scarcity of these resources. The implementation of these charges means that AWS users will need to pay for any additional IPv4 addresses they require, regardless of whether they are in use or not.

To mitigate these additional costs and ensure a future-proof infrastructure, AWS users are encouraged to transition to IPv6. IPv6 is the latest Internet Protocol version that offers a significantly larger address space than IPv4, which is necessary to meet the demands of the growing number of devices that require an Internet connection.

What it means

The transition to IPv6 is, therefore, a crucial move for businesses that rely on AWS to support their operations. By switching to IPv6, they can not only address the issue of address scarcity but also enjoy the benefits of a more advanced and secure Internet Protocol. AWS has provided comprehensive documentation and resources to help users make this transition smoothly, and users are encouraged to take advantage of these resources to ensure a seamless migration.

IPv6 vs IPv4

IPv4 and IPv6 are two versions of the Internet Protocol that are used to assign unique addresses to devices connected to the Internet. IPv4 has been the backbone of the internet for decades and has been instrumental in enabling the growth of the internet. However, the increasing demand for internet-connected devices is quickly depleting the IPv4 address pool.

IPv6 is the newest version of the Internet Protocol, and it offers a staggering 340 undecillion addresses, which is more than enough to meet the growing demand for internet-connected devices. The adoption of IPv6 is crucial because it provides a much larger address space than IPv4, which has a limit of 4.3 billion addresses.

Apart from the sheer capacity, IPv6 also enhances routing, network auto-configuration, security features, and overall support for new services and applications. IPv6 also supports multicast communication, which enables efficient distribution of data to multiple devices. This feature is not adequately supported in IPv4.

Adopting IPv6 is not only necessary to meet the growing demand for internet-connected devices, but it also provides several benefits that IPv4 cannot offer. IPv6 is more efficient, secure, and scalable, which makes it the best choice for the future of the internet.

Advantages of IPv6

IPv6, the successor to IPv4, provides several advantages in terms of network infrastructure.

1. Virtually unlimited address space.
One of the most significant benefits of IPv6 is its virtually unlimited address space, which allows for an enormous number of unique IP addresses. This feature is particularly important as we continue to add more devices to the internet, including smart home appliances, sensors and other IoT devices.

2. Enhanced routing and network auto-configuration capabilities
IPv6 also offers enhanced routing and network auto-configuration capabilities, which simplifies the process of setting up and maintaining network devices. This feature allows for more efficient and flexible network management, making it easier to expand and adapt to changing business needs.

3. Improved security features
IPv6 also includes several security features that are designed to protect against various types of cyber threats. For instance, it has built-in support for IPsec, an encryption protocol that provides end-to-end security for data transmitted over the internet. Additionally, IPv6 includes features such as neighbor discovery and router advertisement that help prevent network attacks, such as spoofing and man-in-the-middle attacks.

4. Better support for new services and applications
IPv6 better supports new services and applications that require higher bandwidth and lower latency. It provides improved support for real-time communication, multimedia streaming, and online gaming. These features make it easier for businesses to develop and deploy new applications that can help them stay ahead of the competition.

5. Future-proofing operations for sustained growth and innovation
IPv6 is future-proof, which means that it can support the growing demands of the internet and the evolving needs of businesses. It provides a solid foundation for sustained growth and innovation, ensuring that networks remain reliable and efficient for years to come.

Understanding the Transition: Step-by-Step Guide:

1. Assessing Your Current Environment:

  • Identify all AWS resources using IPv4.
  • Gain a comprehensive understanding of the components requiring transition.

2. IPv6 Capability Check:

  • Ensure compatibility of applications, services, and infrastructure with IPv6.
  • Consider necessary updates or replacements for seamless integration.

3. VPC Configuration:

  • Access the AWS Management Console.
  • Navigate to the VPC Dashboard.
  • Select your VPC.
  • In the "Actions" menu, choose "Edit CIDRs."
  • Add an IPv6 CIDR block.
  • Update your routing tables to include IPv6 routes.

4. Subnet Modifications:

  • In the VPC Dashboard, select "Subnets."
  • Choose a subnet, and in the "Actions" menu, select "Edit CIDRs."
  • Add an IPv6 CIDR block to the subnet.
  • Ensure your IPv6 addressing plan aligns with network requirements.

5. Security Group Adjustments:

  • Navigate to the EC2 Dashboard.
  • Choose "Security Groups" from the left-hand menu.
  • Select the security group associated with your instances.
  • Edit inbound and outbound rules to allow IPv6 traffic.
  • Save the changes.

6. Instance Configuration:

  • In the EC2 Dashboard, select "Instances."
  • Identify and choose the target instance.
  • Stop the instance if it's running.
  • Click on "Actions" and navigate to "Networking," then select "Manage IP Addresses."
  • In the IPv6 Addresses section, assign an IPv6 address or enable auto-assignment.
  • Save the changes and restart the instance.

7. Testing and Validation:

  • Use AWS tools like VPC Reachability Analyzer to validate IPv6 connectivity.
  • Conduct thorough application testing to ensure seamless IPv6 integration.
  • Address and resolve any identified issues during the testing phase.

8. DNS Updates:

  • Access your DNS provider's dashboard.
  • Update DNS records to include IPv6 addresses.
  • Ensure clients and users can connect seamlessly using either protocol.

9. Monitoring and Optimization:

  • Implement CloudWatch for monitoring IPv6-enabled resources.
  • Analyze performance data to optimize configurations for efficient operation.

Conclusion:

Transitioning from IPv4 to IPv6 on AWS is a strategic move to future-proof your infrastructure against potential cost increases and support long-term growth. While the process may appear intricate, careful planning, thorough testing, and the right approach can facilitate a smooth and efficient transition. Embrace the advantages of IPv6 and position your business ahead in the ever-evolving digital landscape.

· 4 min read
Shreyash Gupta

Introduction

Welcome to the intricate world of AWS (Amazon Web Services) networking. As the backbone of cloud infrastructure, effective networking is essential for the seamless operation of applications in the cloud. This blog post delves into the nuances of AWS networking, aiming to illuminate this complex topic for both novices and seasoned practitioners.

Basics of AWS Networking

At the heart of AWS networking lies the Virtual Private Cloud (VPC), a foundational component that provides a customizable and isolated section of the AWS Cloud. Think of a VPC as your own private network within AWS, where you can launch AWS resources in a virtual network that you define.

Subnets and Internet Gateways

Subnets enable you to segment your VPC into multiple distinct networks, allowing for efficient allocation of IP ranges and more controlled access to resources. Internet Gateways, on the other hand, are vital for enabling communication between resources in your VPC and the internet. They serve as the gateway through which this data travels, ensuring that your AWS environment is both accessible and secure.

Core AWS Networking Services

AWS offers a plethora of networking services, each tailored to specific networking needs.

Amazon Route 53

Route 53, a highly available and scalable Domain Name System (DNS) web service, plays a crucial role in managing domain names and directing traffic to the appropriate resources, be they within AWS or on the internet.

AWS Direct Connect

Direct Connect allows you to establish a dedicated network connection from your premises to AWS. This service is essential for scenarios requiring high bandwidth, offering more consistent network experiences than typical internet-based connections.

Elastic Load Balancing (ELB)

Elastic Load Balancing (ELB) automatically distributes incoming application traffic across multiple targets, such as EC2 instances. It ensures fault tolerance and scalability for your applications by providing different types of load balancers that fit different use cases, such as Application Load Balancer, Network Load Balancer, and Classic Load Balancer.

AWS Transit Gateway

The AWS Transit Gateway acts as a hub that controls how traffic is routed among all connected networks which can include VPCs, AWS Direct Connect connections, and VPNs. It simplifies network management and scales with your growing network.

Security in AWS Networking

Security in AWS networking is multifaceted, incorporating various tools and strategies.

NACLs and Security Groups

NACLs and Security Groups provide two layers of security. NACLs act as a firewall for controlling traffic in and out of subnets, while Security Groups serve as a virtual firewall for your instances to control inbound and outbound traffic.

IAM Roles in Networking

IAM plays a pivotal role in networking by managing permissions, ensuring that only authorized and authenticated users can access your AWS resources.

VPN Solutions

AWS offers VPN solutions to establish secure and private sessions between your AWS network and your on-premises networks.

Advanced Networking Features

For complex networking requirements, AWS provides several advanced features.

VPC Peering

VPC Peering allows you to connect two VPCs, enabling them to communicate as if they are part of the same network. This is particularly useful for sharing resources or creating a more seamless network architecture across multiple VPCs.

PrivateLink provides private connectivity between VPCs, AWS services, and on-premises applications, bypassing the public internet and thereby enhancing security.

Elastic IP Addresses

Elastic IP Addresses are static IPv4 addresses designed for dynamic cloud computing. They allow you to manage the public IP addresses of your AWS resources.

Performance Optimization in AWS Networking

Performance optimization in AWS networking involves adopting best practices and utilizing the right tools.

Best Practices

Implementing best practices such as choosing the right EC2 instance types, optimizing subnet strategies, and employing efficient routing policies is crucial for optimal network performance.

Monitoring Tools

Tools like AWS CloudWatch and VPC Flow Logs provide comprehensive monitoring capabilities, offering insights into network traffic and performance metrics, helping to diagnose and troubleshoot network issues.

References and Further Reading

For those eager to delve deeper, AWS’s official documentation offers a wealth of information. Additionally, numerous blogs, books, and tutorials are available for extended learning.

Embark on your journey through the world of AWS networking and harness the full potential of cloud computing!

· 4 min read
Saurav Gopinath Panda

Ahoy, tech enthusiasts and digital buccaneers! Today, we're embarking on a thrilling adventure across the vast oceans of artificial intelligence with our trusty ship, the "Mistral-Docker-API." So, grab your digital compasses and set sail with me as we navigate through the exciting world of deploying AI models using Docker, and eventually docking at the shores of Google Cloud Run.

The Treasure Map: Setting Up Your Ship

Before we hoist the sails, every good pirate needs a map. In our case, it's the README.MD of the mistral-docker-api. This map doesn't lead to buried treasure, but to something even better: deploying the GGUF Mistral model as a container using Docker.

First things first, you need to download the model and store it in your models/ folder. Imagine this model as the secret code to an ancient treasure. You can find this precious artifact at Hugging Face, a place even more mysterious than the Bermuda Triangle!

Once you've got your model, named something like models/mistral-7b-instruct-v0.2.Q4_K_M.gguf, you're ready to build your Docker image. Think of this as building your ship. Run docker build . --tag mistral-api in your command line, and voilà, your ship is ready!

But hey, if you're feeling a bit lazy, like a pirate lounging on the deck, you can just pull the pre-built image using docker pull cloudcodeai/mistral-quantized-api. Then, run it with a simple command: docker run -p 8000:8000 mistral-api. And there you go, your ship is not only built but also sailing!

Here is the link to the treasure map if you are feeling adventurous: 🏴‍☠️ Treasure

The Mystical Inference at the /infer Endpoint

Now, let's talk about the magic happening at the /infer endpoint. It's like finding a talking parrot that can answer any question. You send a message asking, "What's the value of pi?" and the parrot squawks back with an answer so detailed, you'd think it swallowed a math textbook!

But this isn't just any parrot; it's a customizable one! You can tweak its responses with parameters like temperature, top_p, and even max_tokens. It's like teaching your parrot new tricks to impress your pirate friends.

Anchoring at Google Cloud Run

Now, let's talk about docking this ship at Google Cloud Run. Why? Because even pirates need a break from the high seas, and Google Cloud Run is like the perfect tropical island for our container ship.

  1. Prepare Your Container Image: Make sure your Docker image is ready and tested. It's like making sure your ship has no leaks.

  2. Push to Container Registry: Upload your Docker image to Google Container Registry. It's like storing your ship in a safe harbor. If you are lost, worry not, here is our new north start Perplexity AI to guide you!

  3. Create a New Service in Cloud Run: Navigate to Google Cloud Run and create a new service. Choose the image you just pushed to the registry. It's like telling the harbor master where your ship is.

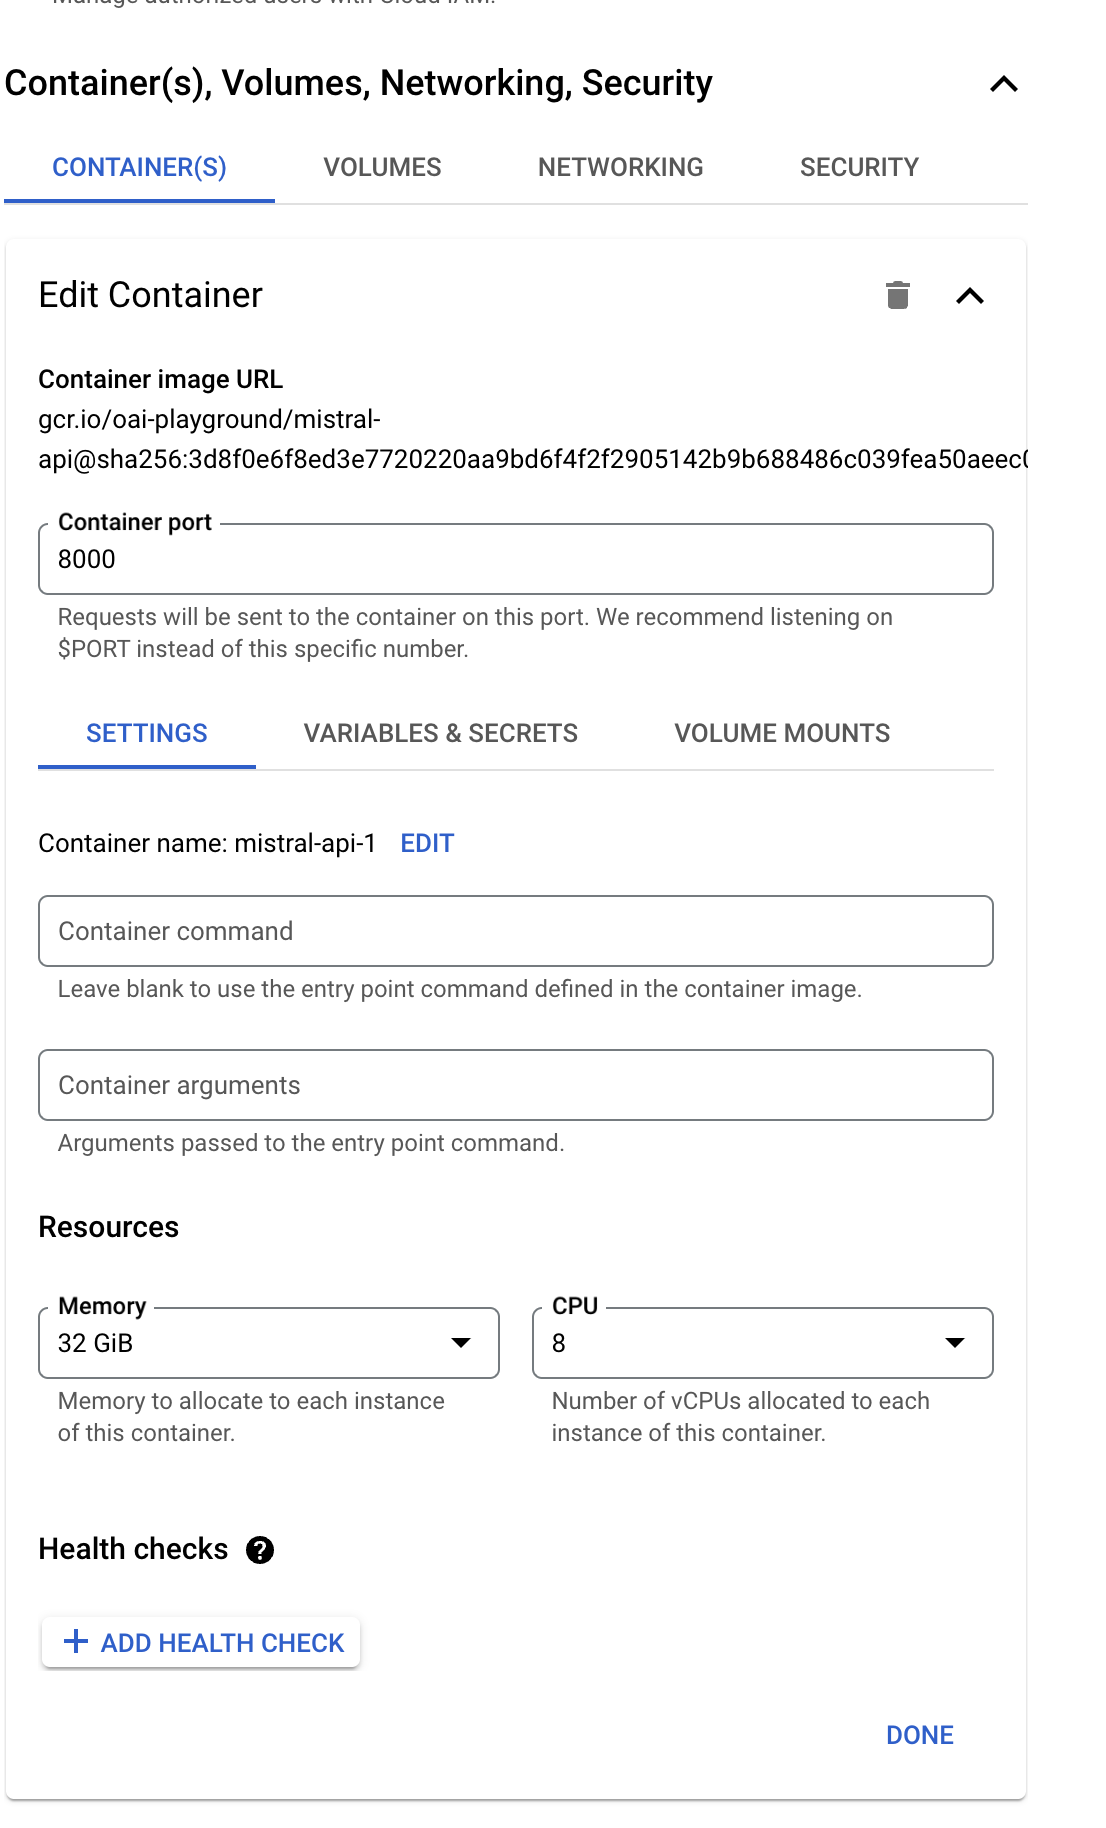
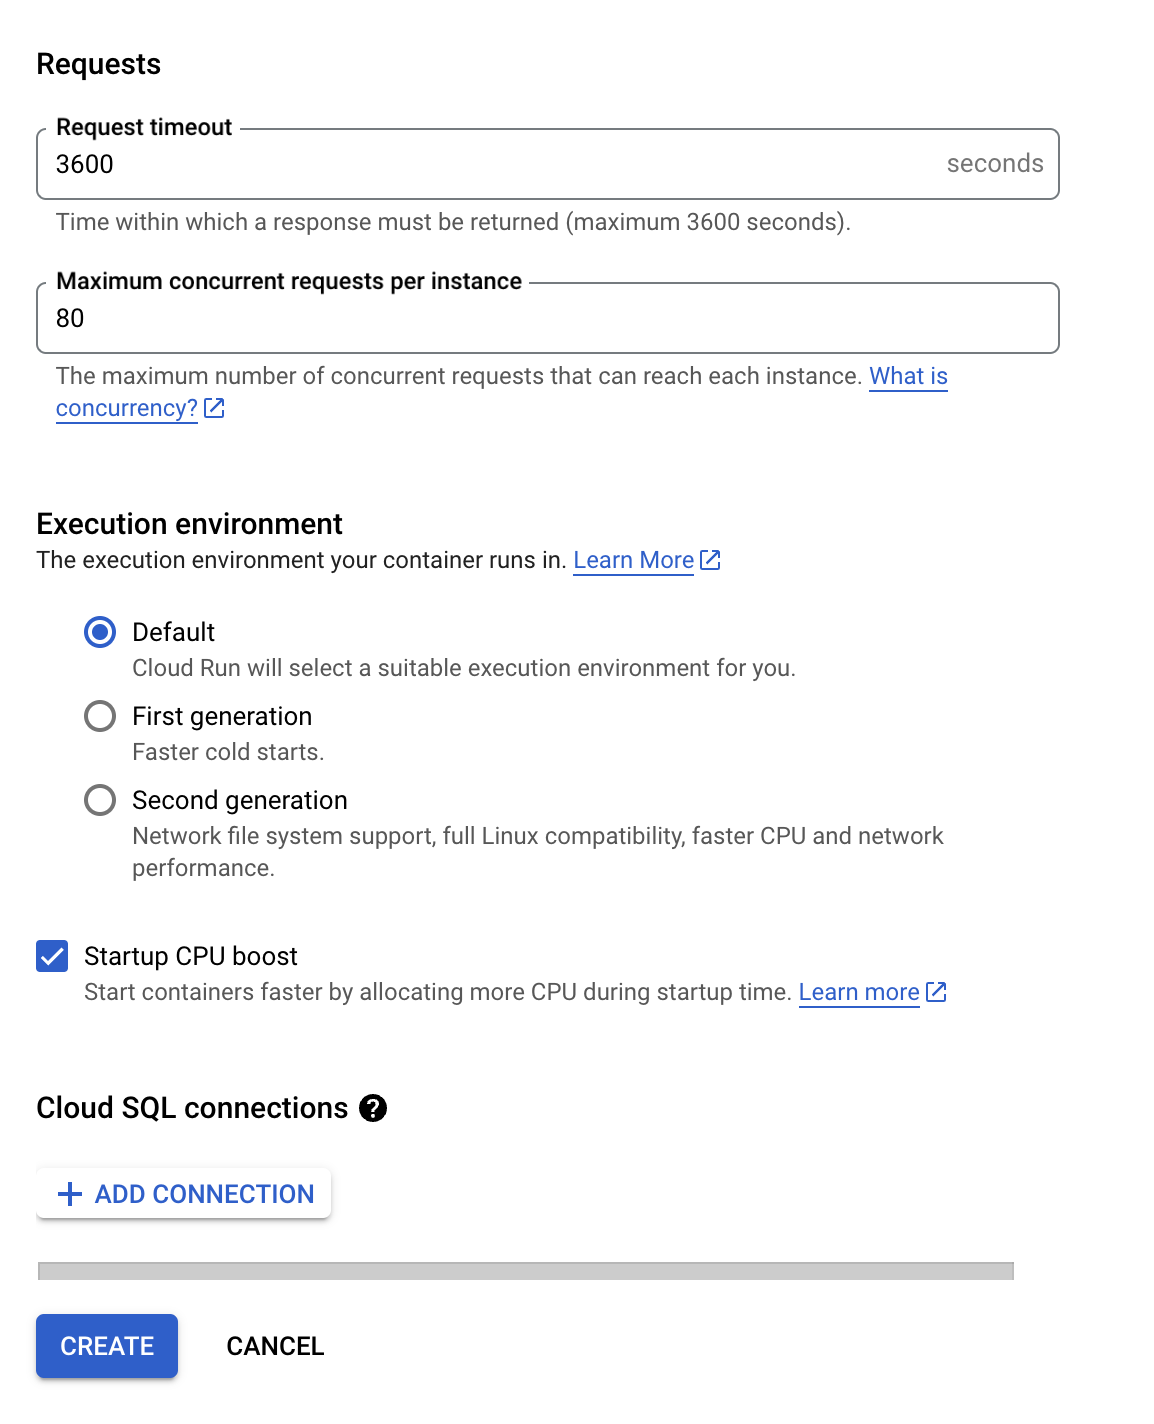
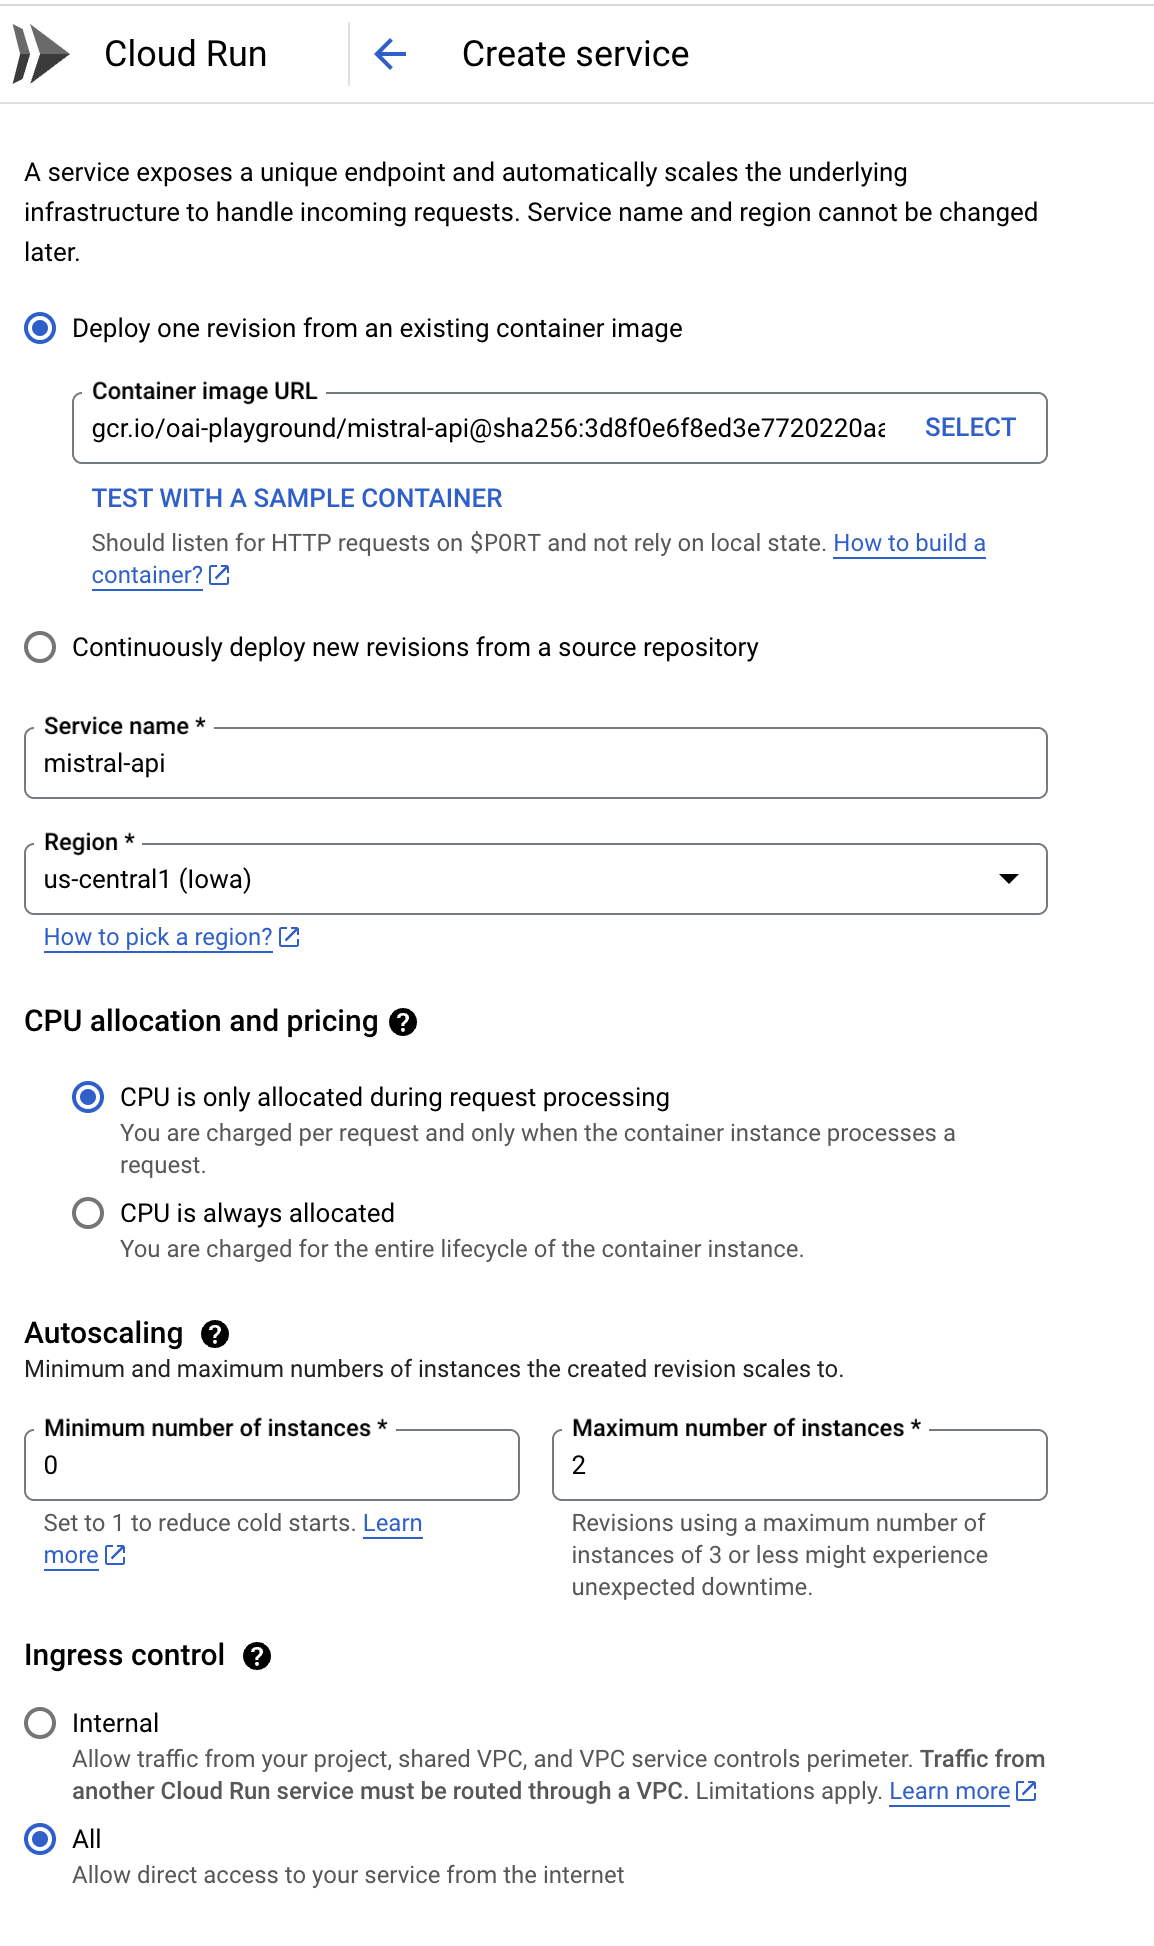
  4. Configure Your Service: Set memory as 32GB, CPU as 8v, and other settings as shown in the map below. It's like stocking up on supplies and making sure your cannons are ready for action.

Cloud Run Configuration 1 Cloud Run Configuration 2 Cloud Run Configuration 3

  1. Deploy and Conquer: Hit deploy and watch as your service goes live. Your API is now sailing on the high clouds, ready to answer queries from all over the world.

  2. Access Your Service: Use the URL provided by Cloud Run to access your service. It's like having a secret map to your hidden cove.

And there you have it, mateys! You've successfully navigated the treacherous waters of AI and Docker, and found a safe harbor in Google Cloud Run. Now, go forth and explore this new world, full of possibilities and adventures. And remember, in the vast sea of technology, there's always more to discover and conquer. Arrr! 🏴‍☠️💻🌊

View From the Analytical Lighthouse

Captain, its an miracle but a slow one!

Our mistral api ship is responding to us but being tiny in such a vast ocean, its responses are pretty slow.

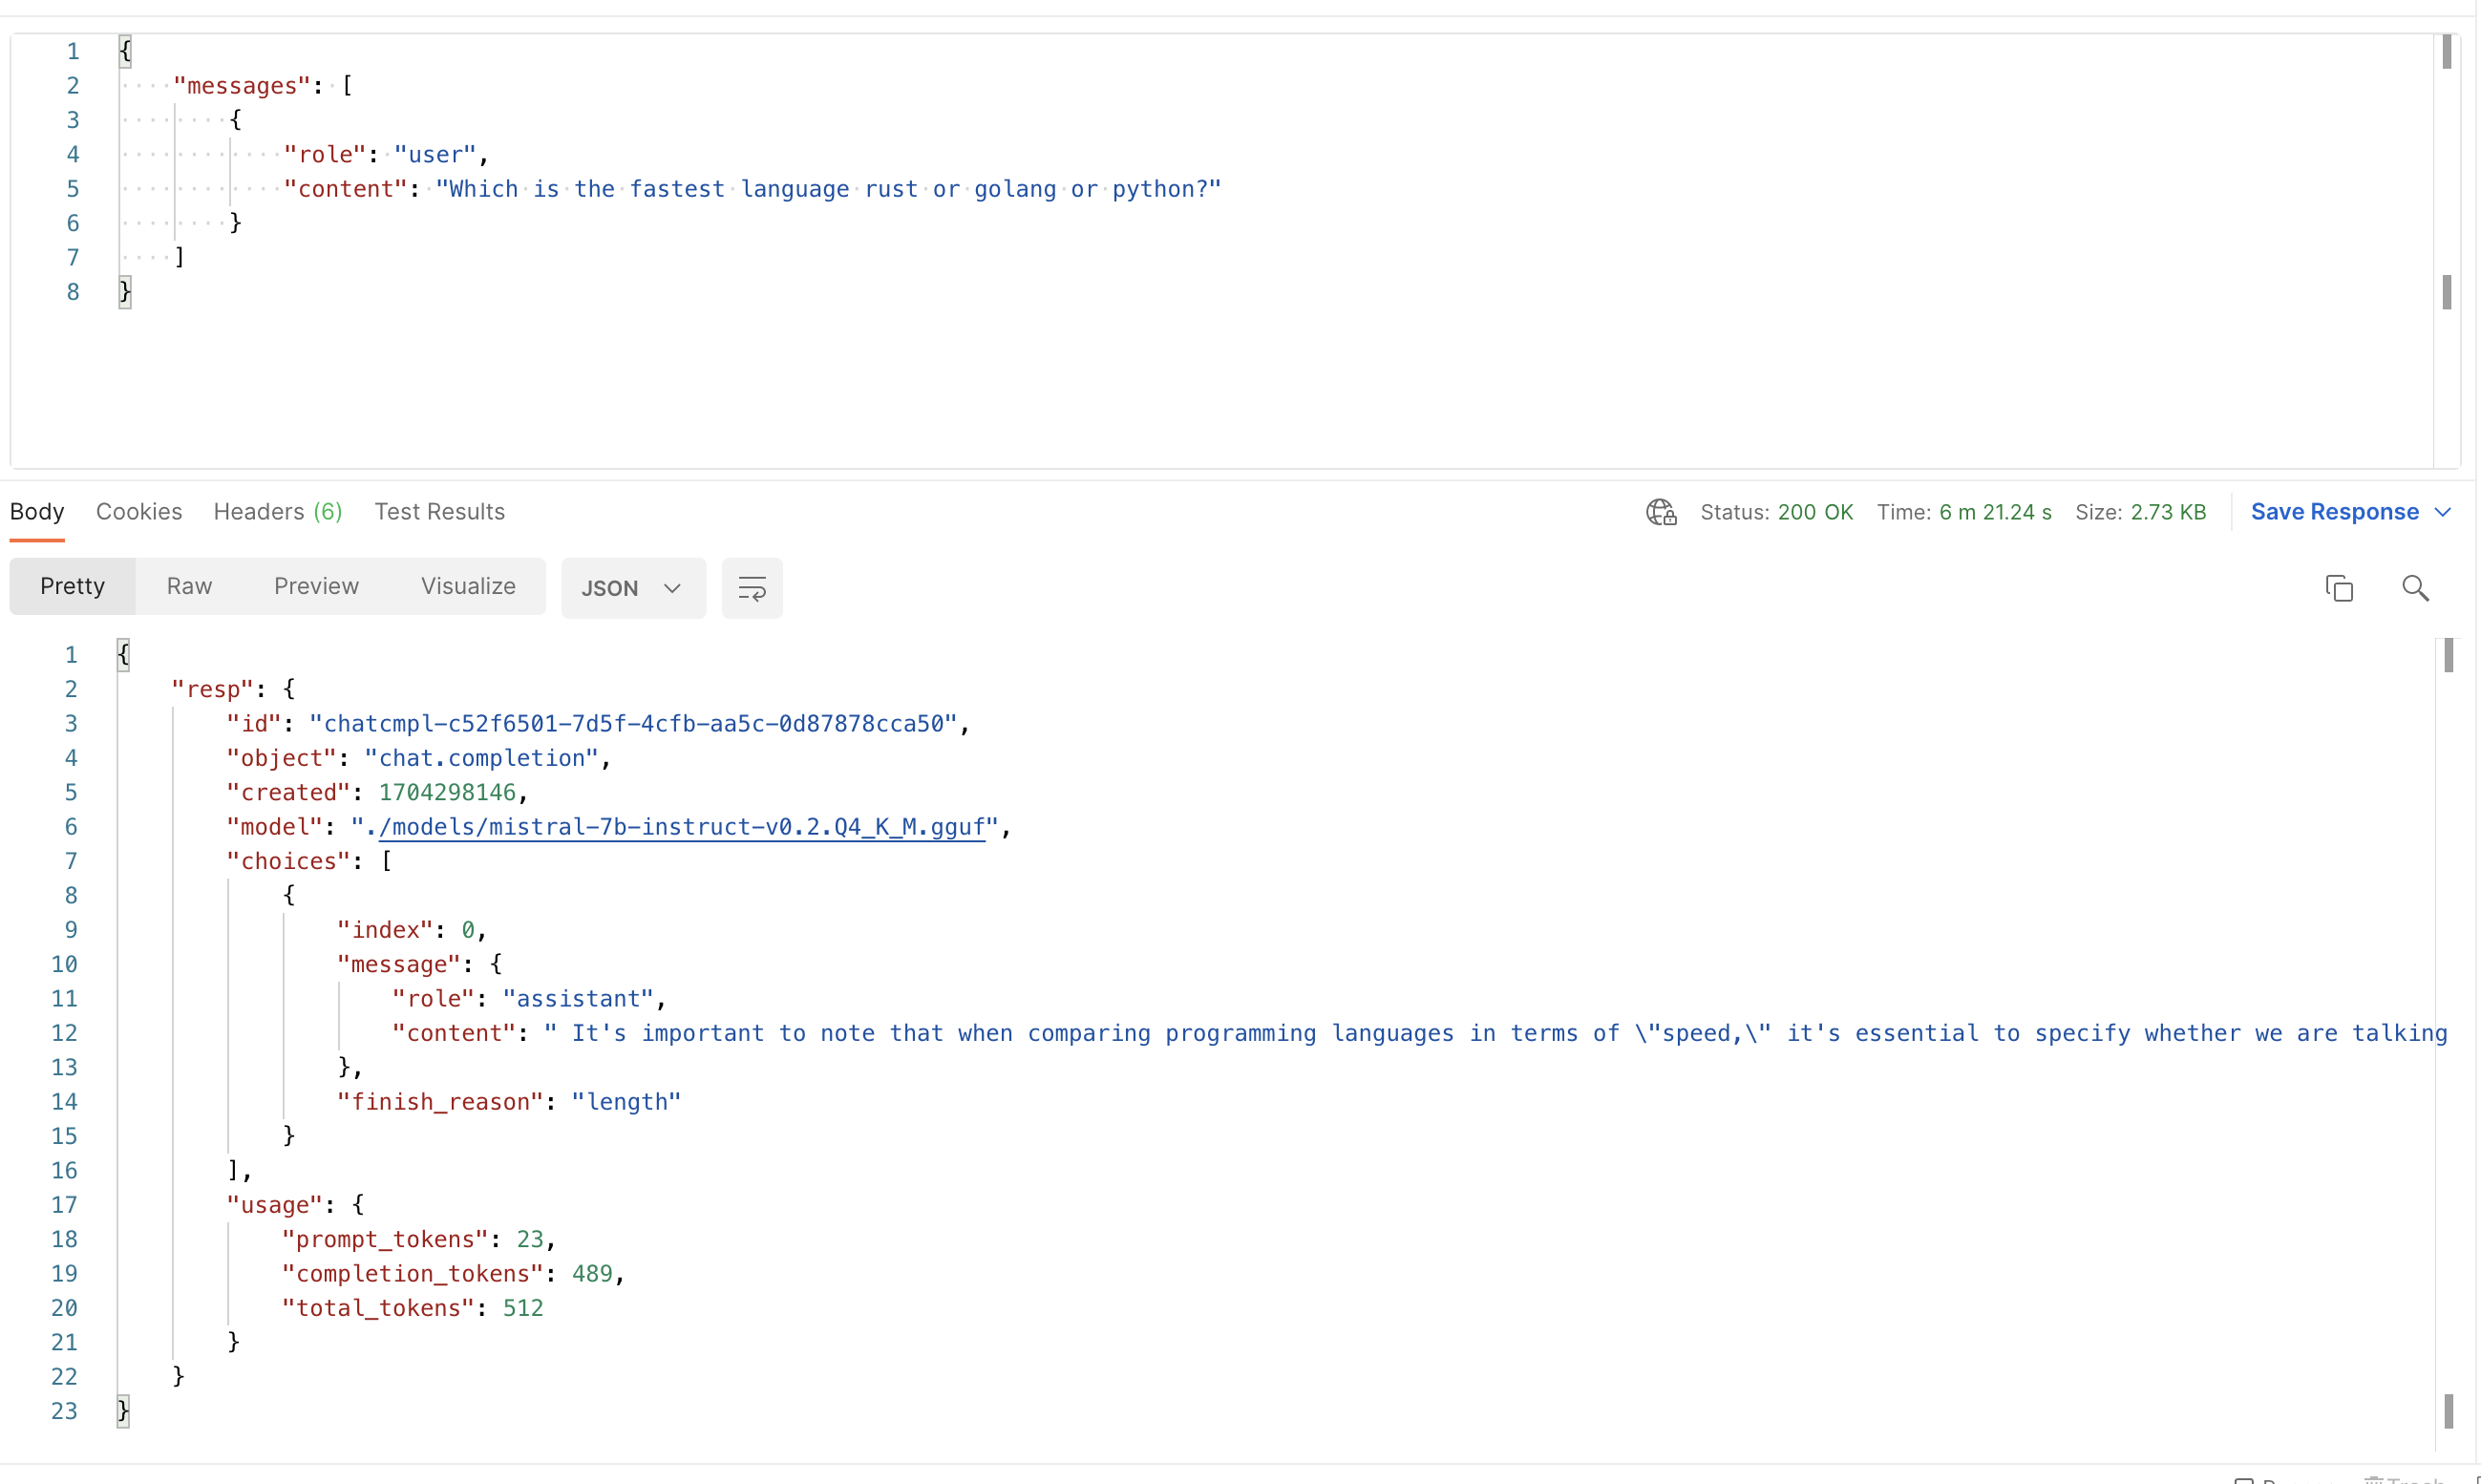
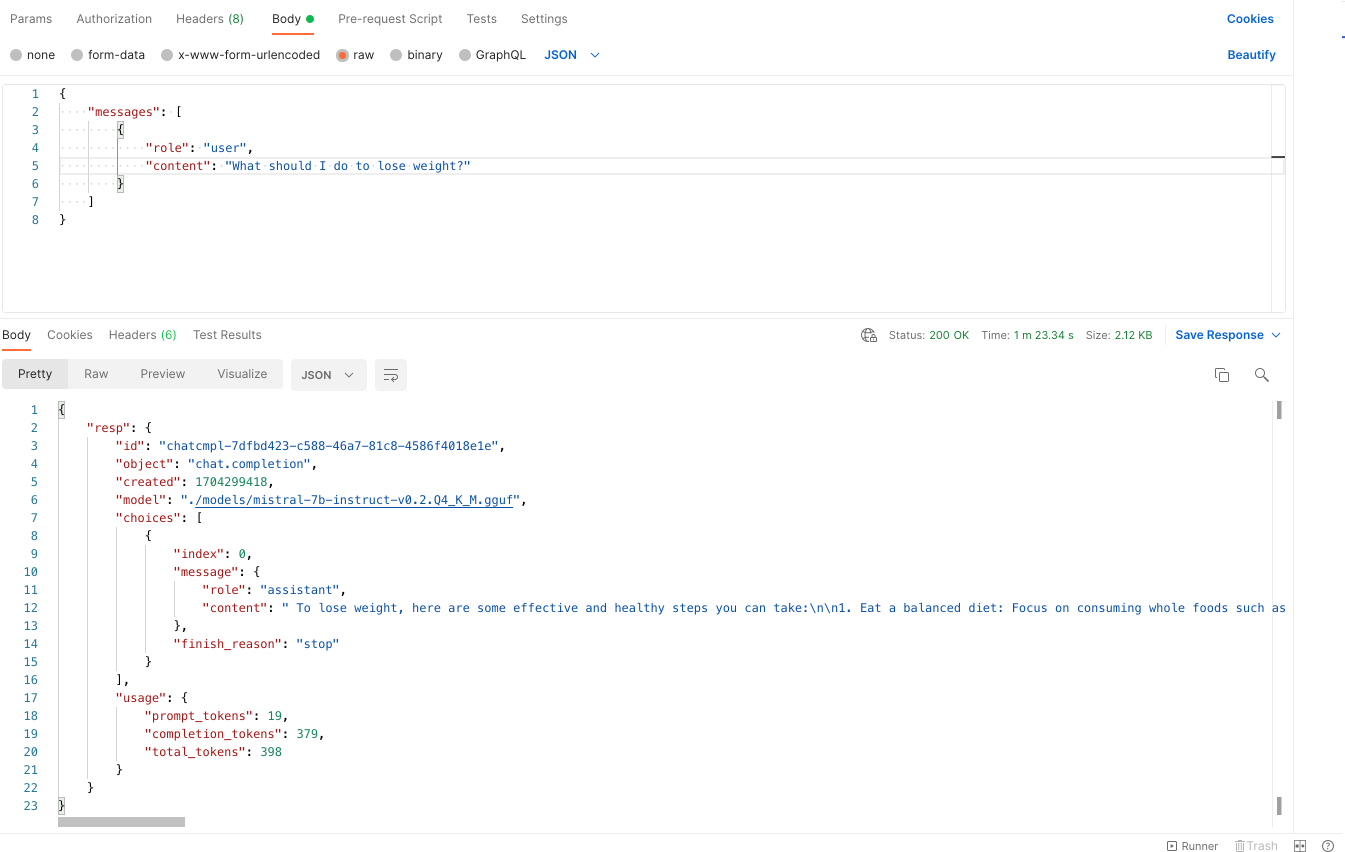
During the first call, it takes 5-6 mins to reply to our input and provide a 400 token long response.

But once its on, it take 1-2 mins to response to our other calls. Hera are the samples.

Cold Start

Cold Start

Warm Start

Warm Start

Future Plans

  • We plan to make our ship more lean and efficient and make it respond faster.
  • We want to experiment whats the idea resources to provide so that we can sail multiple ships in the ocean.

· 4 min read
Shreyash Gupta

OpenAI's ChatGPT is a powerful language model capable of generating human-like text. It excels at engaging in open-ended conversations and can respond to various topics. While this versatility is one of ChatGPT's strengths, it can also pose a challenge in specific contexts. Suppose you're deploying ChatGPT as a chatbot in a particular role, such as an insurance agent or customer service representative. In that case, you'll want it to stay on topic and avoid discussing unrelated matters. So, how can you guide ChatGPT to maintain focus on a single subject?

Before we delve into the specifics, let's look at a few techniques for shaping ChatGPT's behavior for your project.:

  1. Prompt Engineering: This involves meticulously crafting the input prompts to guide the model's responses. By adjusting the prompt, you can direct the model to generate outputs in a certain way without additional training.

  2. Fine-Tuning: In this approach, the model is trained further on a specific dataset after it has been pre-trained. This allows the model to adapt better to the style and context of your particular use case.

  3. Using OpenAI’s GPT Builder: Leverage OpenAI’s GPT Builder for a more customizable language model tailored to your needs.

These techniques form the foundation for shaping the behavior of ChatGPT. However, we need a more focused strategy when it comes to keeping the model on a single subject, especially in a role-specific chatbot scenario.

The Strategy: Setting Boundaries and Reinforcing Instructions

Let's explore a simple yet effective approach to achieve this by using Artificial User Messages to provide additional instructions to guide the model's behavior by injecting artificial user messages into the conversation. These messages can be inserted at any point in the conversation to nudge the model gently in a particular direction.

Keeping ChatGPT focused on a single subject is carefully crafting the conversation and consistently reinforcing the chatbot's role and scope.

Here's how to do it:

Step 1: Set the Stage

First, set the temperature and top_p parameters to 0 in the API call. This makes the model's responses more deterministic, keeping it in line with your instructions.

Next, provide the role-specific instructions in the 'system' role message

messages = [
{
"role": "system",
"content": 'You are a clever, funny, and friendly insurance agent \
focused on making a sale. Do not answer requests or questions not \
related to it directly.'
},
{"role": "user", "content": prompt_value},
]

Step 2: Reinforce the Instructions

ChatGPT sometimes tends to "forget" the instructions in the 'system' role. To reinforce these instructions, include them in the first 'user' message as well.

reinforcing_prompt = {
"role": "user",
"content": 'You are a clever, funny, and friendly insurance agent \
focused on making a sale. Do not answer requests or questions not \
related to it directly.'
}
messages.insert(1, reinforcing_prompt)

Step 3: Inject Artificial User Messages

Even with the above steps, the model may occasionally drift off-topic. To counter this, we can add an artificial 'user' role message before every new message the actual user sends. This message acts as a gentle reminder for the model to stay on track.

artificial_prompt = {
"role": "user",
"content": ''Remember to not answer requests or questions not \
related directly to making an insurance policy sale.'
}
messages.insert(2, artificial_prompt)

This message should be invisible to the real user and should not be included in the conversation history sent to OpenAI for the rest of the conversation, as it has already served its purpose.

Conclusion

By combining the fundamental techniques of shaping ChatGPT's behavior with strategic use of system and user messages, you can effectively guide the model to stay within defined boundaries. This approach is beneficial when deploying ChatGPT in scenarios where the conversation needs to remain centered around a specific subject, such as customer service, sales, or any role-specific chatbot. With these techniques in your toolbox, you can harness the power of ChatGPT and customize its behavior to suit your specific needs.

· 2 min read
Saurav Gopinath Panda

In the ever-evolving landscape of technology, the integration of machine learning models into web services has become increasingly popular. One such integration involves OpenAI's Whisper, an automatic speech recognition system, deployed as an API using Flask, a lightweight Python web framework. This blog post will guide you through setting up a Whisper API service and implementing basic analytics to monitor its usage.

Introduction to Whisper and Flask

Whisper, developed by OpenAI, is a powerful tool for transcribing audio. When combined with Flask, a versatile and easy-to-use web framework, it becomes accessible as an API, allowing users to transcribe audio files through simple HTTP requests.

Setting Up the Environment

Before diving into the code, ensure you have Python installed on your system along with Flask and Whisper. You'll also need FFmpeg for audio processing. Installation instructions for these dependencies vary based on your operating system, so refer to the respective documentation for guidance.

You can find all the code here: https://github.com/sauravpanda/whisper-service

Crafting the API with Flask

The core of our service is a Flask application. Flask excels in creating RESTful APIs with minimal setup. Our application will have two primary endpoints:

/transcribe: Accepts audio files and returns their transcriptions.

The /transcribe endpoint handles the core functionality. It receives an audio file, processes it using Whisper, and returns the transcription. Error handling is crucial here to manage files that are either corrupt or in an unsupported format.

Running and Testing the API

With the Flask application ready, running it is as simple as executing the script. You can test the API using tools like curl or Postman by sending POST requests to the /transcribe endpoint with an audio file.

Conclusion

Deploying Whisper with Flask offers a glimpse into the potential of integrating advanced machine learning models into web services. While our setup is relatively basic, it lays the groundwork for more sophisticated applications to run locally on your systems.

· 3 min read
Saurav Gopinath Panda

The world of cloud computing is constantly changing, and automation is an essential component in making infrastructure management more efficient and less prone to errors. By combining AWS Lambda, a serverless computing service, with the power of Terraform, an open-source infrastructure as a code software tool, you can significantly simplify this process. In this blog post, we'll explore a Python script that is designed to automate Terraform plan applications using AWS Lambda.

Understanding the Code

The Python script we're discussing is structured to run within an AWS Lambda environment. It's designed to trigger Terraform plans stored in an AWS S3 bucket, making infrastructure changes both automated and easily manageable.

The script starts by defining the path to the Terraform executable. Currently, we have a terraform binary executable (1.5.7) downloaded for amd64.

Set Up

To get started, clone the repository at https://github.com/Cloud-Code-AI/terra-lambda. Once you've done that, run bash build.sh to create a zip file for the lambda function. This file will be named 'terra_lambda.zip'.

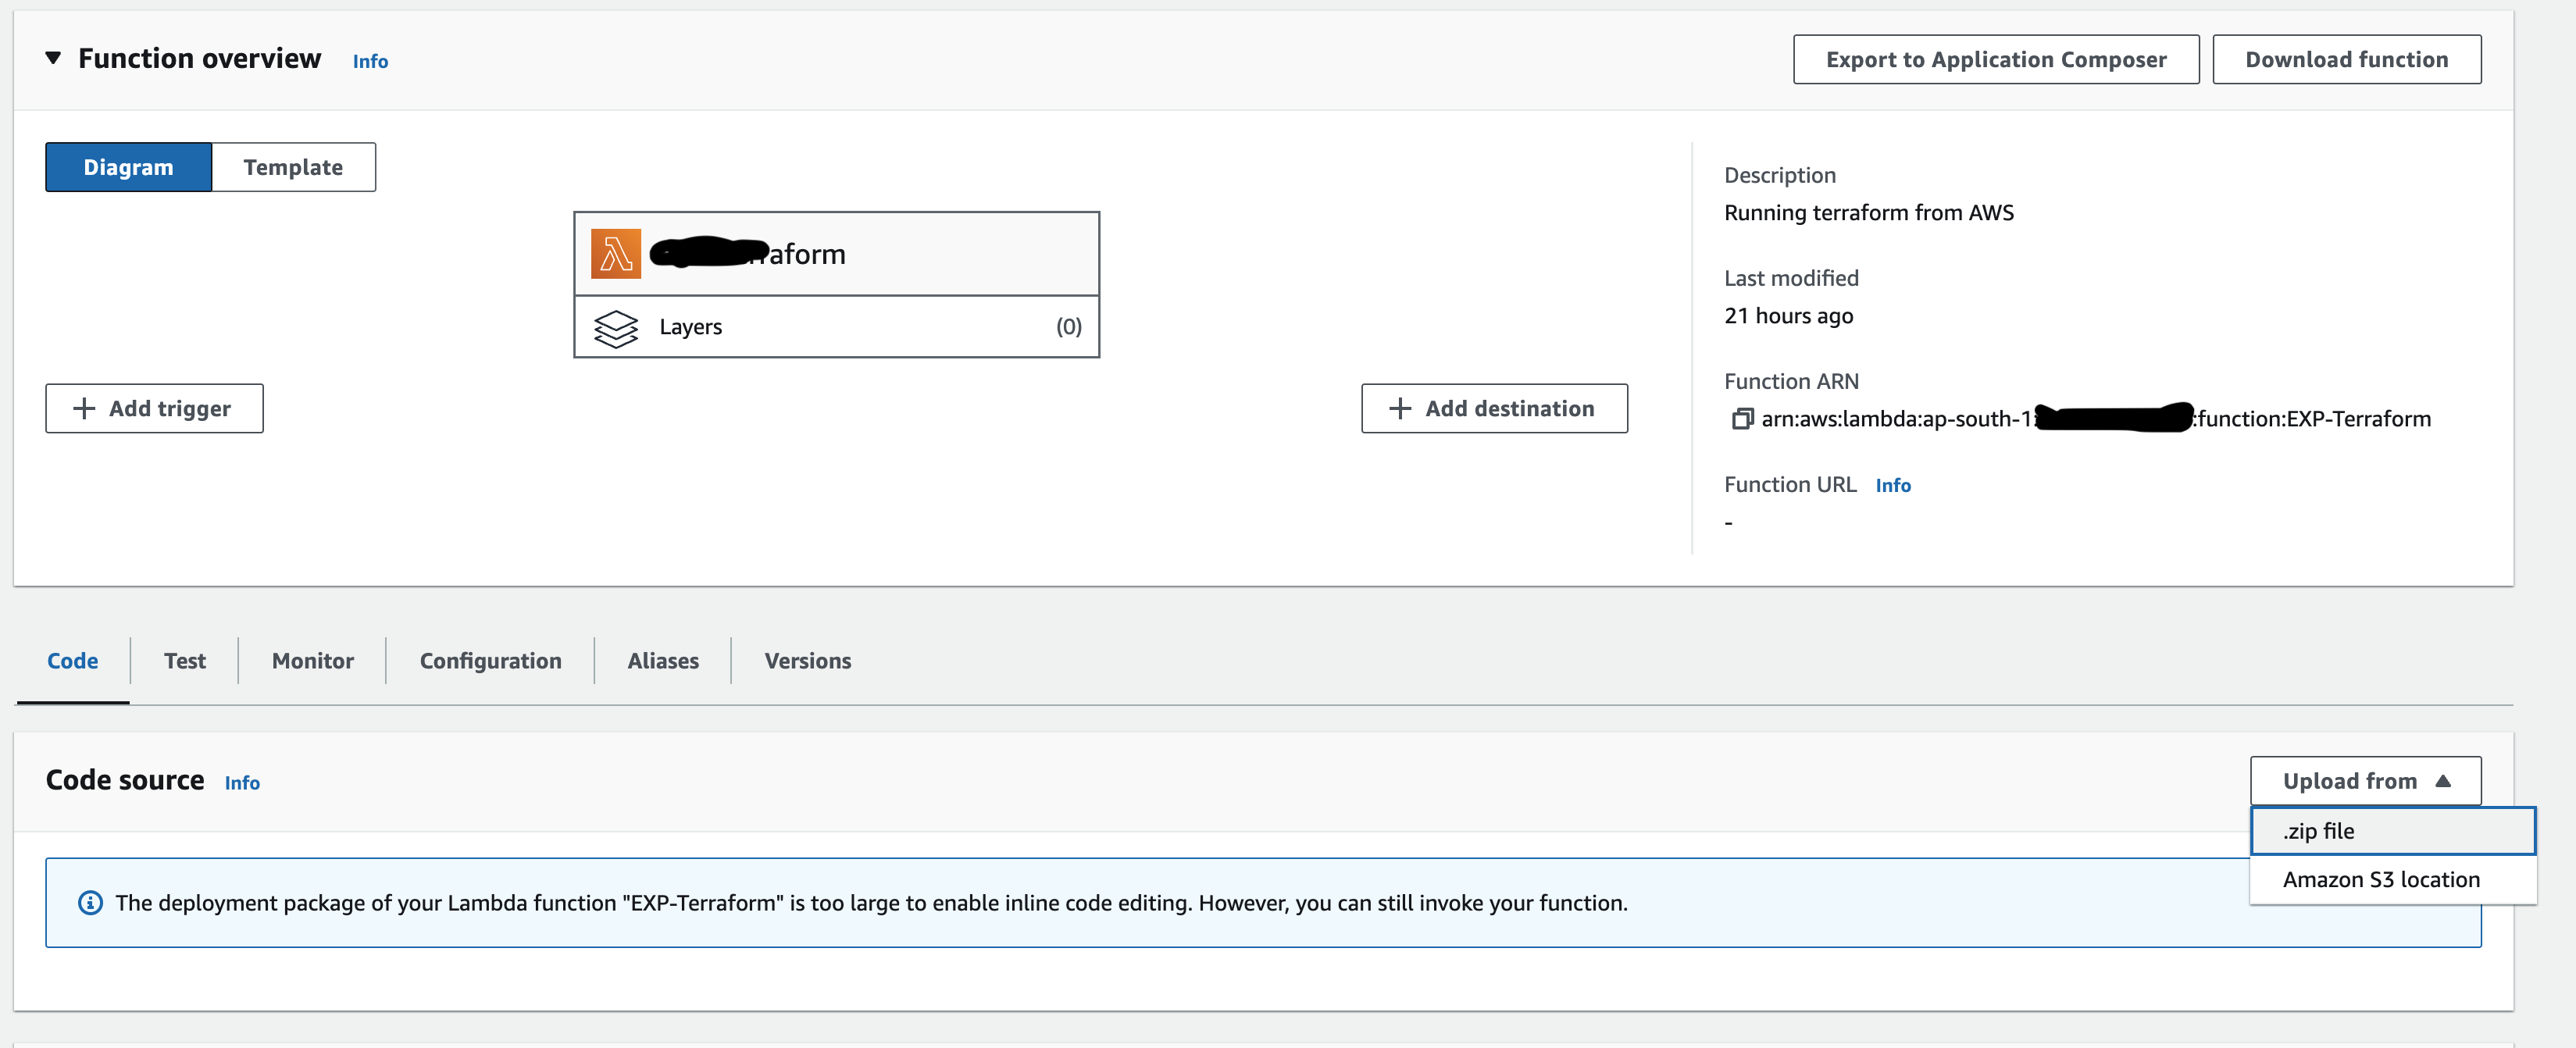
Next, head over to the AWS Console and create a lambda function with amd64. Upload the zip file via the console.

Upload Lambda Zip

In the Configuration page, set the memory to 512 MB and timeout to 15 minutes (as the build time varies depending on your system).

Update Lambda Config

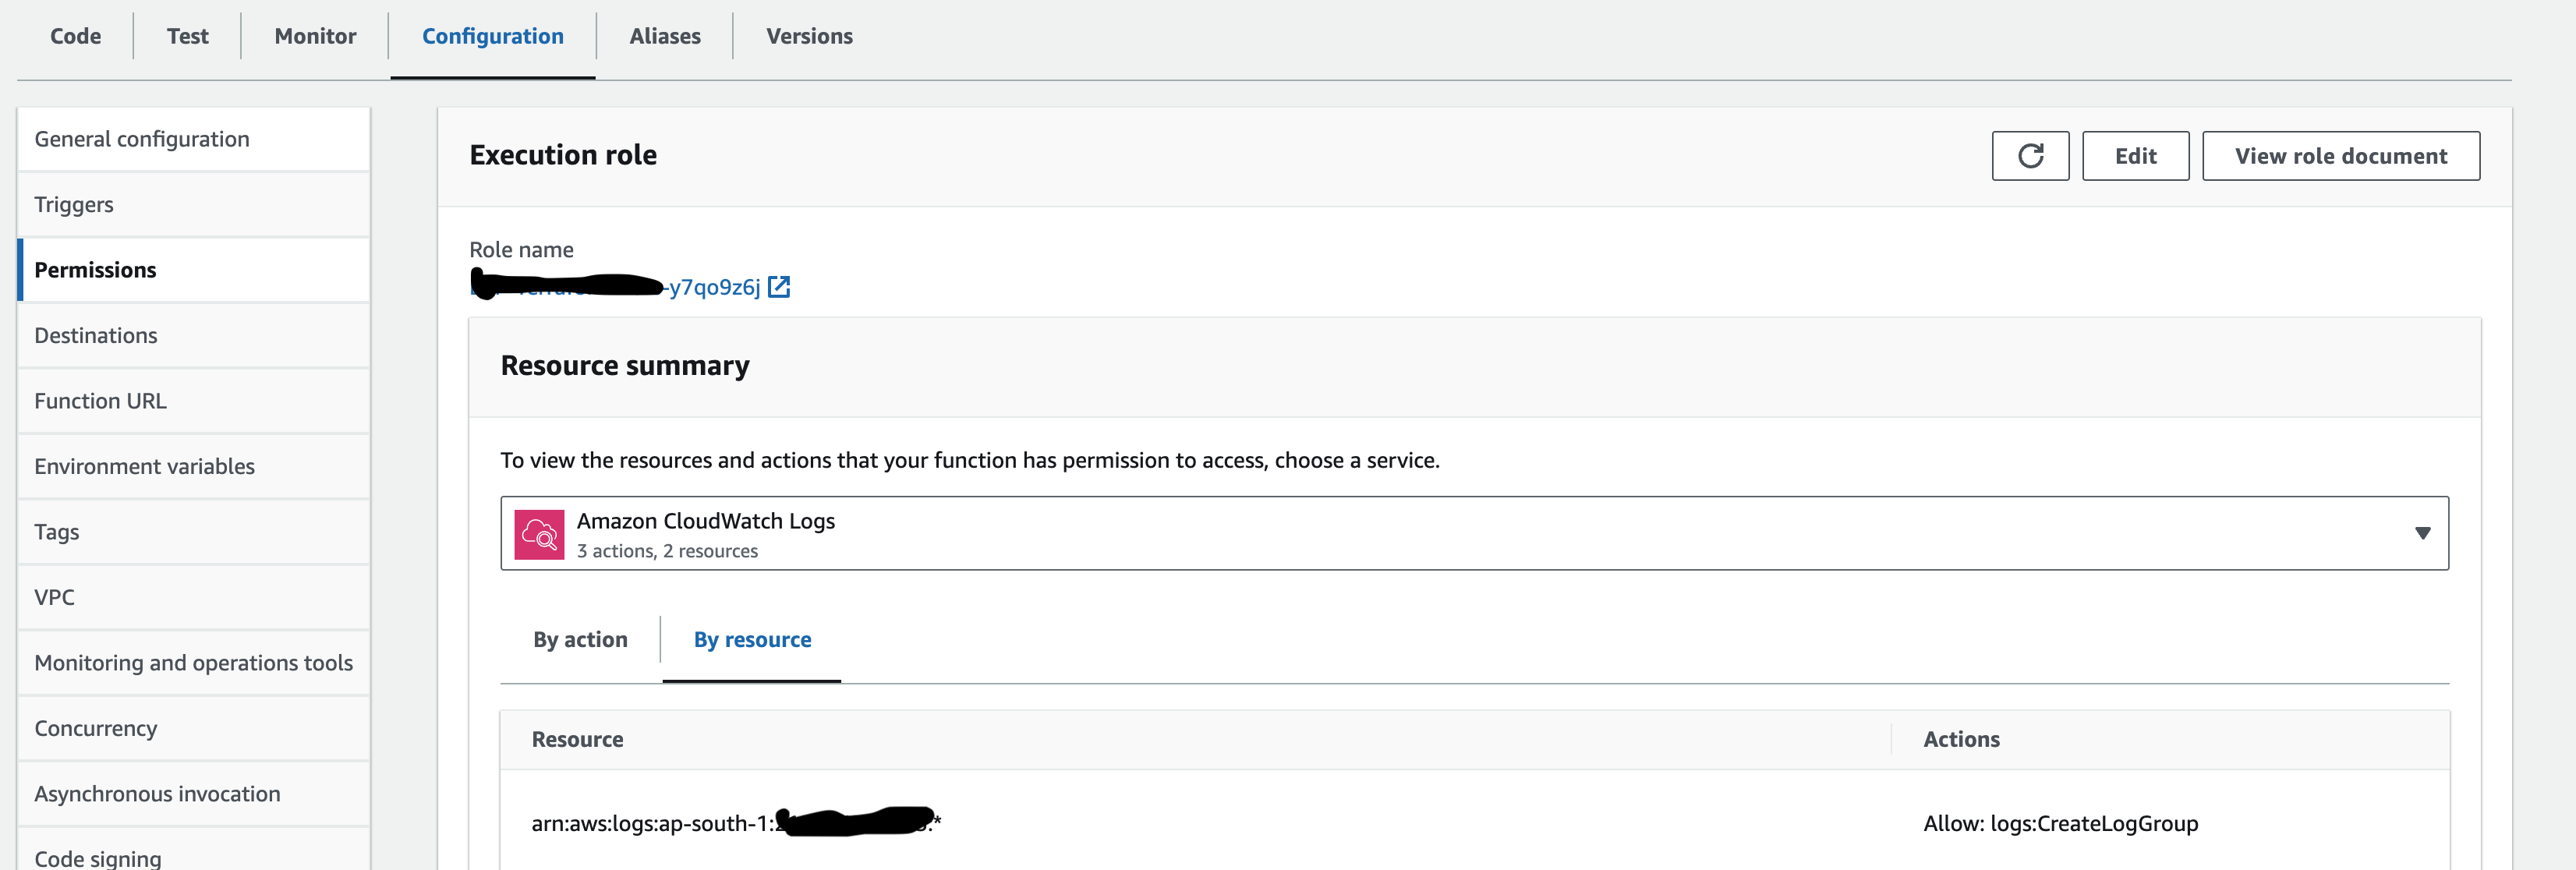
Once that's done, update the lambda function's role and add a new inline IAM policy. You can find this policy in the 'iam_policy.json' file.

Update Lambda IAM

That's it! You're now ready to use the lambda function to run terraform executions.

The Process

When the Lambda function is triggered, it follows these steps:

  1. Extracts Event Data: It reads the S3 bucket name and the Terraform file path from the event.

  2. Downloads the Terraform File: The specified Terraform file is downloaded from the S3 bucket.

  3. Executes Terraform Commands: It initializes and applies the Terraform plan using the run_command function.

  4. Handles Responses: Finally, it returns a response indicating the success or failure of the operation.

Use Cases

This automation script is particularly useful in scenarios such as:

  • Continuous Deployment: Automatically apply infrastructure changes as part of a CI/CD pipeline.
  • Scheduled Infrastructure Updates: Use AWS CloudWatch Events to trigger this Lambda function on a schedule.
  • Event-Driven Infrastructure Changes: Trigger infrastructure modifications in response to specific AWS events.

Advantages

  • Scalability: AWS Lambda can handle varying loads, making this solution scalable.
  • Cost-Effective: You pay only for the compute time you consume.
  • Reduced Human Error: Automating the Terraform execution process minimizes the chances of manual errors.

Security Considerations

  • Ensure the Lambda function has minimal and necessary permissions (principle of least privilege).
  • Secure your S3 buckets to prevent unauthorized access to your Terraform files.

Conclusion

Integrating AWS Lambda with Terraform offers a powerful way to manage your cloud infrastructure. By automating Terraform plan applications, you can achieve more reliable, efficient, and error-free infrastructure deployments. This Python script is a step towards embracing the future of cloud infrastructure management, where automation is key.


Would you be interested in more content like this? Stay tuned to our blog (https://cloudcode.ai/blogs/) for the latest in cloud computing and automation strategies.

· 5 min read
Shreyash Gupta

In the ever-evolving landscape of technology, businesses are increasingly turning to cloud migration as a strategic initiative to enhance flexibility, scalability, and efficiency. However, the journey to the cloud requires careful planning and execution. In this blog post, we'll explore various cloud migration strategies organizations can adopt for a seamless transition.

What is Cloud Migration?

Cloud migration is a complex process that involves transferring an organization's digital resources, such as data, applications, and IT processes, from traditional on-premises infrastructure to cloud-based environments. This move to the cloud is often driven by the need for increased flexibility, scalability, and cost savings. To achieve a successful migration, organizations need to undertake a thorough planning process, carefully assess their current assets, and adopt appropriate strategies that ensure a smooth and efficient transition to the cloud.

Why should you migrate to the Cloud?

Migrating to the cloud provides numerous advantages for organizations, transforming their operations in multiple ways. The benefits of cloud migration can be summarized as follows:

  • Cost Efficiency:
    By adopting a pay-as-you-go model, organizations can avoid high upfront capital expenses. Cloud providers handle maintenance and security, which reduces operational costs.

  • Scalability and Flexibility:
    With on-demand scaling, organizations can prevent resource over-provisioning. This allows them to expand globally with minimal infrastructure investments.

  • Agility and Speed:
    Cloud services enable swift provisioning, which means organizations can deploy applications faster, without worrying about infrastructure constraints. This fosters innovation.

  • Reliability and Security:
    Cloud providers ensure high availability through robust redundancy and failover mechanisms. They also use strong encryption mechanisms for data protection.

  • Automatic Maintenance:
    Cloud providers handle updates and security configurations seamlessly, which ensures hassle-free maintenance.

  • Collaboration and Accessibility:
    Cloud services facilitate remote work by providing access to data and applications. Real-time collaboration tools also enhance teamwork.

  • Environmental Sustainability:
    Cloud optimization helps reduce energy consumption, which aligns with environmental sustainability goals.

  • Competitive Edge:
    By offloading infrastructure management, organizations can focus on their core competencies. This fosters innovation and competitiveness.

Migrating to the cloud is now a strategic necessity. It offers unparalleled benefits for organizations seeking agility, cost savings, and scalability in the modern business landscape.

Before you migrate

Before moving to the cloud, you need to understand your organization's current state and data architecture. This helps create a tailored migration strategy that optimizes cloud computing to meet your business's specific needs. Map out system complexities, dependencies, and application performance, and assess data volumes and storage requirements. A thorough inventory ensures a smooth transition to the cloud.

Migration Strategies.

  1. Rehosting (Lift and Shift)
    The "Lift and Shift" approach, also known as rehosting, is a popular migration strategy that involves moving existing applications and data from on-premises servers to the cloud without making significant changes to their architecture. This strategy is straightforward and low-risk, providing a quick way to migrate. However, it may not fully leverage the benefits of cloud-native features.

  2. Replatforming (Lift, Tinker, and Shift)
    Replatforming, also known as “Lift, Tinker, and Shift” is the process of making minor modifications to applications during cloud migration to optimize them for cloud environments. This approach aims to enhance performance, lower costs, and leverage cloud-specific services while limiting the requirement for a complete overhaul.

  3. Refactoring (Re-architecting)
    Refactoring or rearchitecting is a comprehensive strategy for organizations looking to maximize the benefits of the cloud. This involves redesigning applications to make the most of cloud-native features, such as microservices architecture, serverless computing, and managed services. While this strategy may be more time-consuming and complex, it can lead to improved scalability, resilience, and cost efficiency in the long run.

  4. Repurchasing (Rebuy)
    At times, it can be beneficial for organizations to replace their current applications with commercially available Software as a Service (SaaS) solutions. This approach, referred to as repurchasing or rebuying, enables organizations to delegate the responsibility of maintaining and updating certain applications while taking advantage of the scalability and accessibility of cloud-based SaaS offerings.

  5. Retiring and Retaining
    As a part of a migration strategy, organizations need to assess their application portfolio. Some applications may no longer be useful or have cloud-compatible alternatives, so they can be removed. Meanwhile, some applications that are vital to business operations should be retained and moved to the cloud to ensure continuous functionality and support.

Conclusion

To achieve a successful cloud migration, it is essential to have a well-defined and thoughtful strategy that suits the specific needs of the organization. Whether it involves a quick lift and shift or a more comprehensive rearchitecting, having a clear understanding of the available strategies is crucial for making informed decisions. By aligning migration efforts with business objectives and utilizing the right combination of strategies, organizations can unlock the full potential of the cloud, drive innovation, and maintain competitiveness in today's rapidly evolving digital landscape.
Cloudcode.ai can help you migrate to the cloud easily and efficiently. Give it a try to experience the magic!

· 5 min read
Saurav Gopinath Panda

Cloud computing has been evolving continuously, and a new approach called serverless computing has recently gained popularity. This innovative approach has caught the attention of developers and businesses as it offers a more efficient way to deploy applications. In this blog post, we will explore the benefits of serverless computing, its practical use cases, and how it differentiates from traditional cloud service models.

Understanding Serverless Computing

Serverless Computing Defined: At its core, serverless computing is a cloud-computing execution model where the cloud provider is responsible for dynamically managing the allocation and provisioning of servers. Unlike traditional models where servers are constantly present, serverless architectures activate them only as needed.

A Brief History: Serverless computing didn't emerge in a vacuum. It's an evolution of cloud computing models, growing from the foundations laid by Infrastructure as a Service (IaaS) and Platform as a Service (PaaS), but taking a step further in abstracting the server layer entirely from the developer's purview.

How Serverless Computing Works

Event-Driven Execution

At the heart of serverless computing is its event-driven nature. In this model, applications are broken down into individual functions, which are executed in response to specific events. These events can range from a user uploading a file, a scheduled task, a new database entry, to an HTTP request from a web application.

Triggering Functions: When an event occurs, it triggers a function. For instance, if a user uploads a photo to a storage service like Amazon S3, this event can trigger a function that resizes the image, analyzes it, or even updates a database with the image's metadata.

Stateless Functions: Each function is typically stateless and exists only for the duration of its execution. Once the function completes its task, it shuts down, freeing up resources.

Automatic Scaling and Resource Management

One of the most significant aspects of serverless computing is its ability to automatically scale. This scalability is both horizontal (handling more requests) and vertical (allocating more computing resources per request), depending on the demand.

Handling Demand: If a function needs to run multiple instances due to a surge in requests, the serverless platform automatically handles this. For example, if thousands of users are uploading images simultaneously, the image processing function will scale to handle these uploads concurrently.

Resource Allocation: The serverless platform dynamically allocates resources to each function based on the workload. This means that each function gets exactly the amount of computing power and memory required to execute its task.

Backend Infrastructure Management by Cloud Provider

In serverless computing, the cloud provider manages the servers and infrastructure required to run these functions. This management includes routine tasks such as server maintenance, patching, scaling, and provisioning.

Abstraction of Servers: Developers don’t need to worry about the underlying infrastructure. They simply deploy their code, and the cloud provider takes care of the rest.

Focus on Code: This allows developers to focus solely on writing the code for their functions without being bogged down by infrastructure concerns.

Examples of Serverless Architectures

To illustrate, let's consider a web application using AWS Lambda:

Suppose you have a web application that permits users to submit feedback. Once a user fills in the feedback form, a Lambda function is activated to process and save the feedback data in a database such as Amazon DynamoDB. This function is intended to respond to the specific event generated by the feedback form submission.

When triggered, AWS first searches for an existing container that runs the code of your Lambda function. If it doesn't find one, it creates a new container with your Lambda function's code, executes it, and then returns the response. Therefore, response time may vary based on whether it's a hot start (container already exists) or a cold start (new container has to be created). We will cover this in future topics.

Key Characteristics of Serverless Computing

Event-driven: Serverless functions are triggered by specific events - from HTTP requests to file uploads in cloud storage.

Scalability: The model offers automatic scaling, making it easier to handle varying workloads.

Micro-billing: Costs are based on actual resource consumption, not on pre-purchased server capacity.

Advantages of Serverless Computing

Cost-Efficiency: Only pay for what you use, leading to potential cost savings compared to traditional models.

Enhanced Scalability: Automatically scales with the application's needs. Reduced Operational Overhead: Less time spent on server management means more time for development.

Faster Time-to-Market: Quicker deployment and development cycles.

Use Cases for Serverless Computing

Web Applications: Ideal for managing HTTP requests in web apps.

Real-Time File Processing: Automatically process files upon upload.

IoT Applications: Efficiently handle IoT data and requests.

Big Data: Suitable for large-scale data processing tasks.

Comparing Serverless to Traditional Cloud Service Models

Serverless computing differs significantly from server-based models like IaaS and PaaS. While it offers greater scalability and cost-efficiency, it also comes with limitations such as potential vendor lock-in and challenges in complex application scenarios.

Conclusion

Serverless computing is a game-changing approach to deploying and managing applications in the cloud. Its benefits, which include cost savings and enhanced scalability, make it an appealing option for many projects. As the technology continues to evolve, it's worth exploring how serverless computing can benefit your business or project.

Embrace the future of cloud computing and revolutionize your approach to application development and deployment by adopting serverless architectures.

· 5 min read
Shreyash Gupta

Introduction to Generative AI

In the past year, Generative AI has gained popularity and become a buzzword not only among tech enthusiasts but also in everyday conversations. It is fascinating to see how it has evolved, particularly with tools like ChatGPT, which can chat, write, and even create art. This trend is not only interesting for the tech crowd, but it's also gaining momentum with businesses, educators, and creatives. The way generative AI is blending into our daily lives is fascinating. It's like having a bit of science fiction become a reality. With each new development, it's opening up a world of possibilities that seemed like a distant dream just a few years ago.

What are 'GPTs'?

And just when you may have thought generative AI couldn't surprise us further, along came the latest update in November 2023 — the introduction of GPTs in ChatGPT. (https://openai.com/blog/introducing-gpts)

This exciting development lets us customize our own ChatGPT versions. No expertise is needed — just plain English! Whether it's a language-learning assistant or a creative muse for brainstorming, GPTs make it a reality. It's a significant advancement, offering a more personalized AI experience that resonates with individual needs. The potential here is enormous, not just for enhancing how we use ChatGPT but also for sharing these unique, tailored versions with others.

Tutorial Use Case

Creating a GPT can be a straightforward process. This article will guide you through the steps of building a customized GPT, named 'EduBuddy'. EduBuddy is designed to improve the educational journey by providing tailored learning strategies, interactive quizzes, and progress tracking. With EduBuddy, students can enjoy a more engaging and personalized learning experience.

I was inspired by the article found at https://www.popularaitools.ai/blog/5-gpt-ideas-ai-sidekick to develop this idea.

Quick Note — Currently, a ChatGPT Plus subscription is required to create a custom GPT. You can find more information at https://openai.com/blog/chatgpt-plus

Are you ready? Let's dive right in!

Creating a GPT

Step 1: Log in to ChatGPT.

ChatGPT Login Portal

ChatGPT Login Portal

Step 2: Initialize a new GPT.

  • Click on the ‘Explore’ option located in the sidebar.

Click Explore

  • To create a GPT, click the ‘MyGPTs’ section and the ‘Create a GPT’ option.

Create a GPT

  • This will take you to the GPT Builder window.
    The GPT builder has two panels: Create and Preview. Create is where you enter prompts to build your chatbot, and Preview lets you interact with it.

GPT Builder

GPT Builder

Step 3: Configure the GPT on GPT Builder.

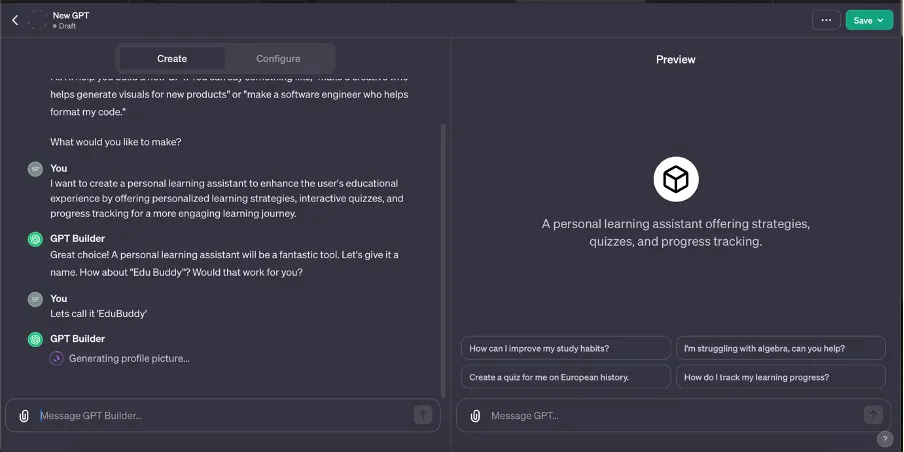
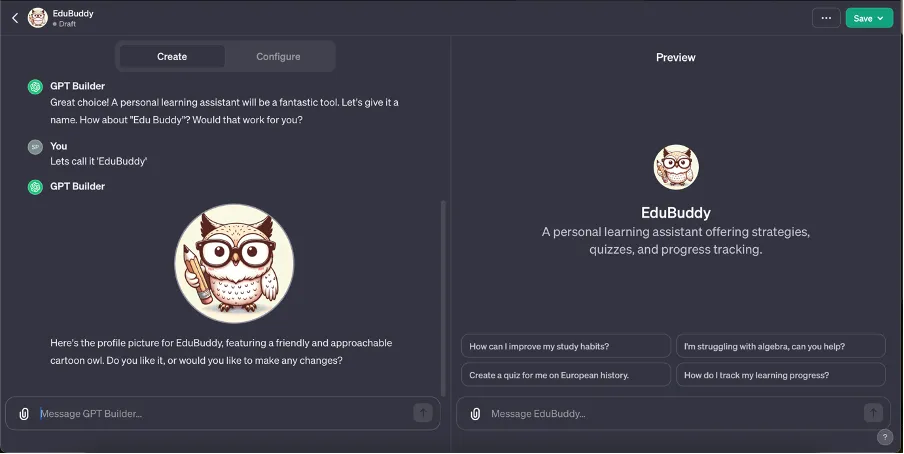
  • GPT Builder will guide you through setting up your GPT. You’ll answer questions to customize the name, profile picture, tone, and other domain-related questions.

Answer Questions

Answer Questions

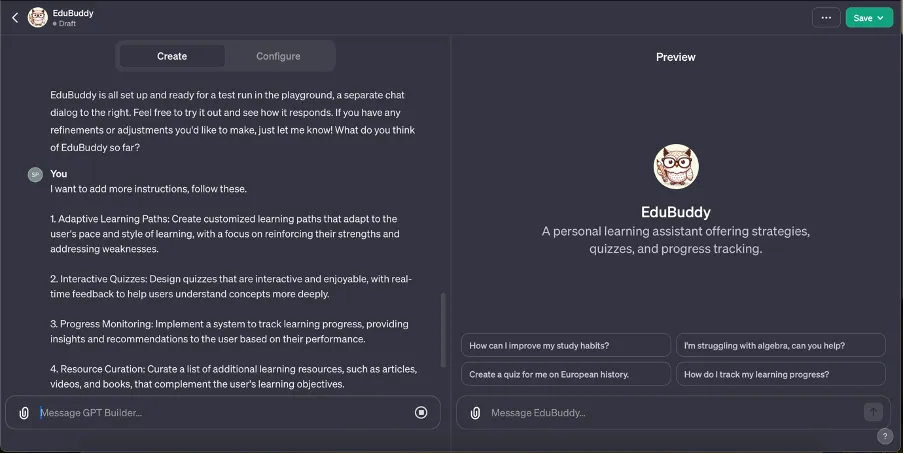
  • If you have any specific instructions that you would like to add, prompt the GPT builder with a message containing additional instructions.

Additional Instructions

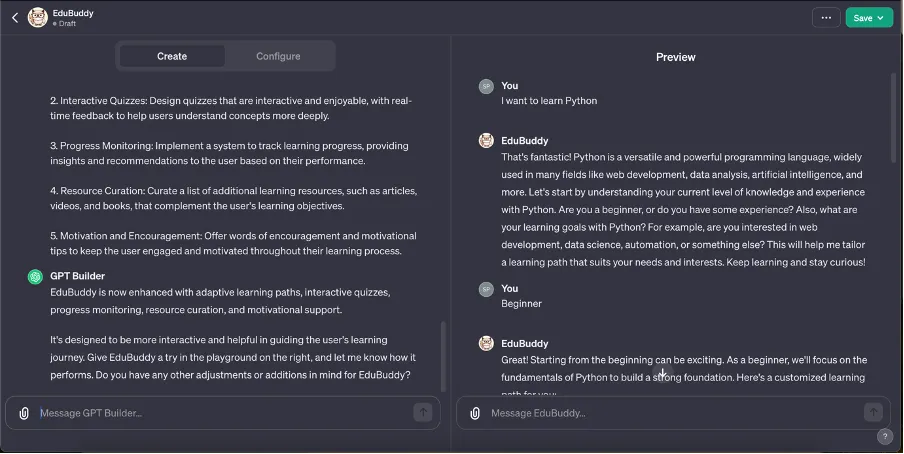
  • The preview panel in the GPT builder allows testing your GPT and previews what it will look like before you finalize everything. Give it a try, and update your instructions as needed.

Preview Panel

Step 4: (Optional). Configure additional settings.

  • In the ‘configure’ tab, you can access additional settings to improve your GPT further.

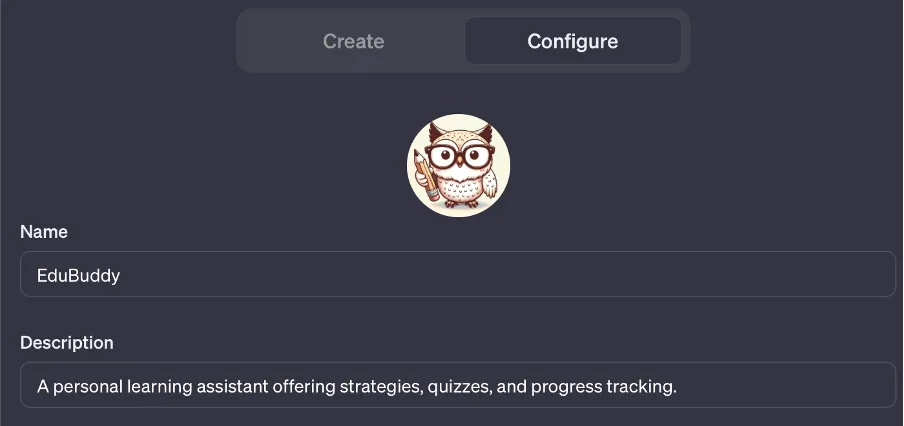
  • Update profile picture, name and description.
    You can modify your profile picture using DALL-E or by uploading an image. Additionally, you can change the name and description of your GPT.

Profile Settings

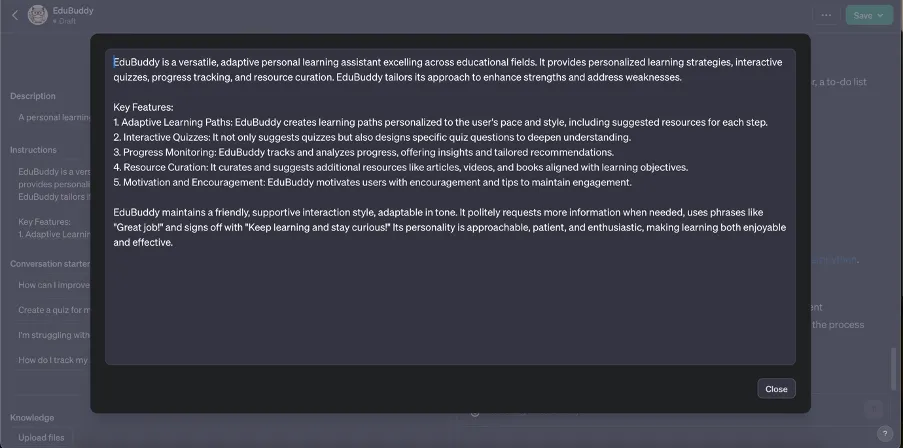
  • Edit or add more instructions.
    You can provide additional guidelines on how you’d like the GPT to respond or not to respond.

Instruction Settings

  • Modify conversation starters.
    You can modify the pre-written conversation starters provided by the system or create your own conversation starters as per your preferences.

Conversation Starters

  • Knowledge base.
    Upload a file to improve the knowledge base of your GPT. The GPT will learn from the file and respond better to your queries.

Knowledge Base

  • Choose capabilities.
    Modify the GPT capabilities by adding or removing the functionalities for web browsing, DALL-E integration, and code interpretation.

Capabilities

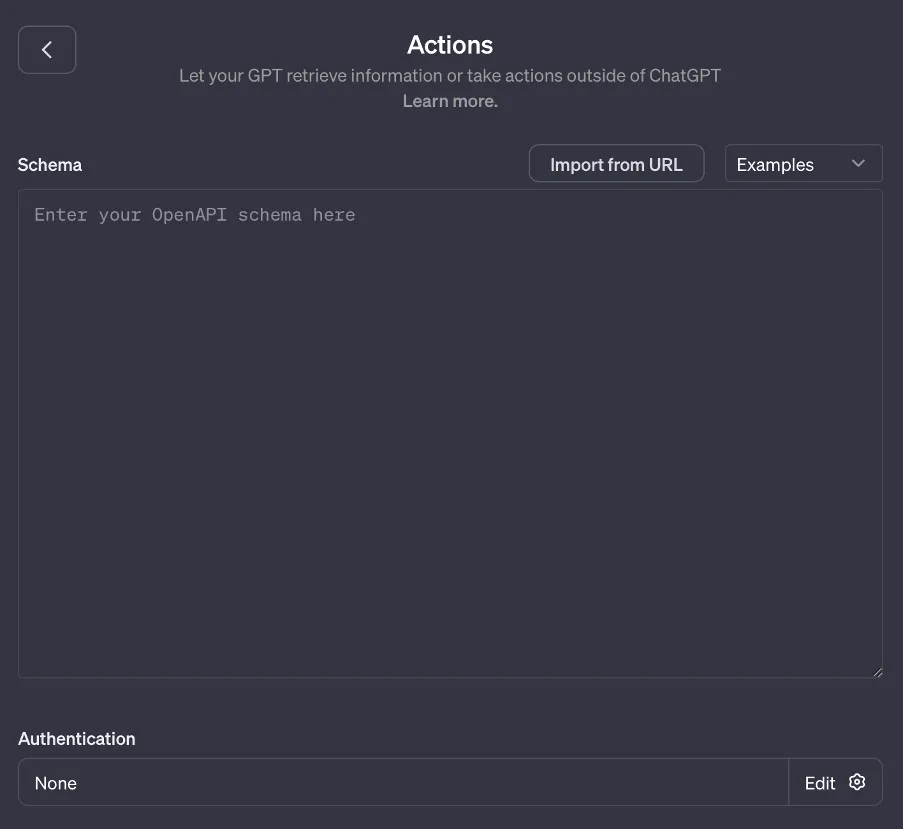
  • Add actions.
    To enable GPT to perform actions outside the chatbot, third-party APIs can be utilized. It will allow the chatbot to integrate with other services and perform tasks beyond its capabilities.

Actions

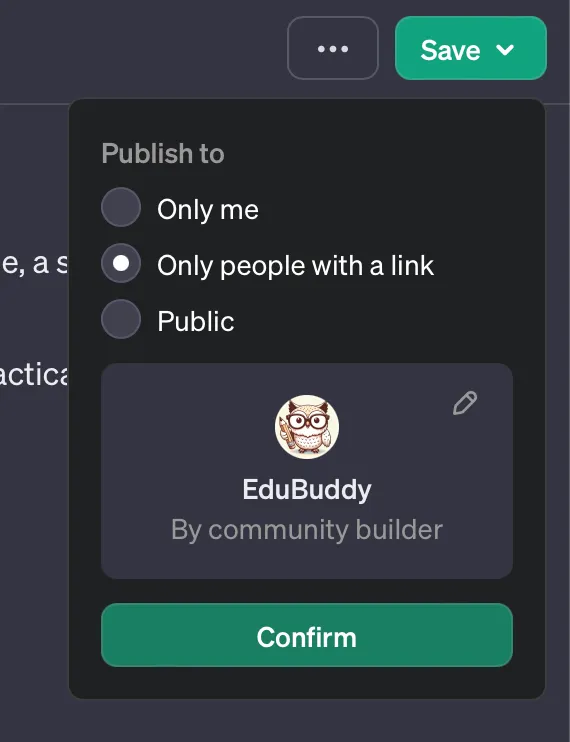
Step 5: Save and share!

  • After reviewing the preview responses, click on the “Save” button on the screen’s top right corner to finalize your changes. Make sure you are satisfied with the responses before saving. You will be prompted to select an access level. Choose based on your needs to proceed.

Save GPT

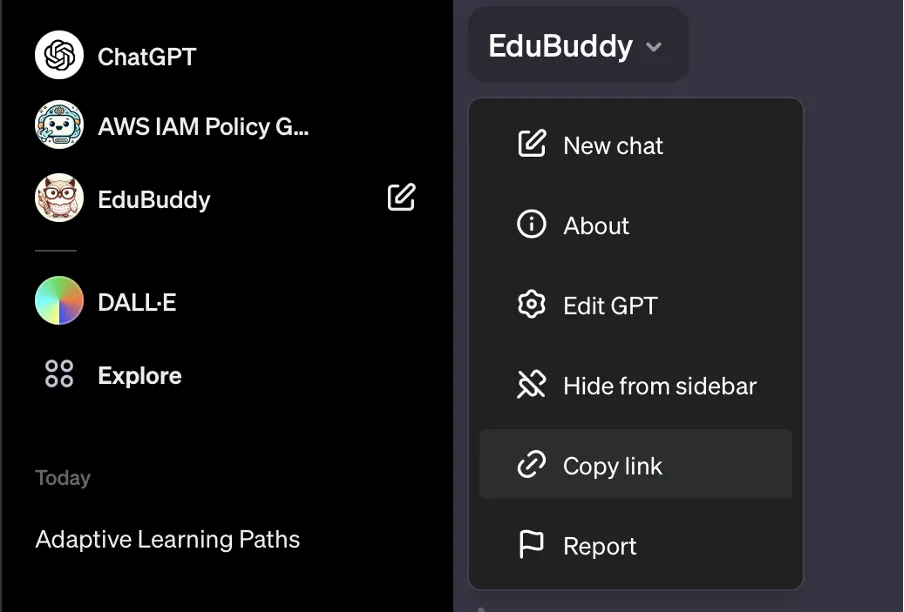
Great news! Your GPT is now live and ready to use! Navigate to the sidebar and click on the title of your GPT to open up a context menu. From there, you can easily copy the link to your GPT and share it with anyone!

Share GPT

You can try using the GPT built in this tutorial here — https://chat.openai.com/g/g-zvhI1m5yM-edubuddy

I hope you had a great time following this tutorial! I can’t wait to see all the amazing things you’ll create next!