
4 posts tagged with "ai"

View All Tags

· 4 min read
Saurav Gopinath Panda

As a fast-growing tech company, we recently found ourselves inundated with a staggering number of applications for a QA Engineer position. Within just 60 hours, we received an overwhelming 180 applications, making the task of manually reviewing each one a daunting challenge. Faced with this predicament, we turned to the power of Large Language Models (LLMs) to help us efficiently evaluate the candidates and identify the most promising ones.

The Challenge: Reviewing 180 Applications in a Timely Manner

With such a large influx of applications in a short span of time, our small team quickly realized that manually reviewing each one would be an extremely time-consuming and arduous task. We needed a more efficient solution that could help us streamline the evaluation process without compromising the quality of our candidate assessment.

The Solution: AI-Powered Application Reviewer

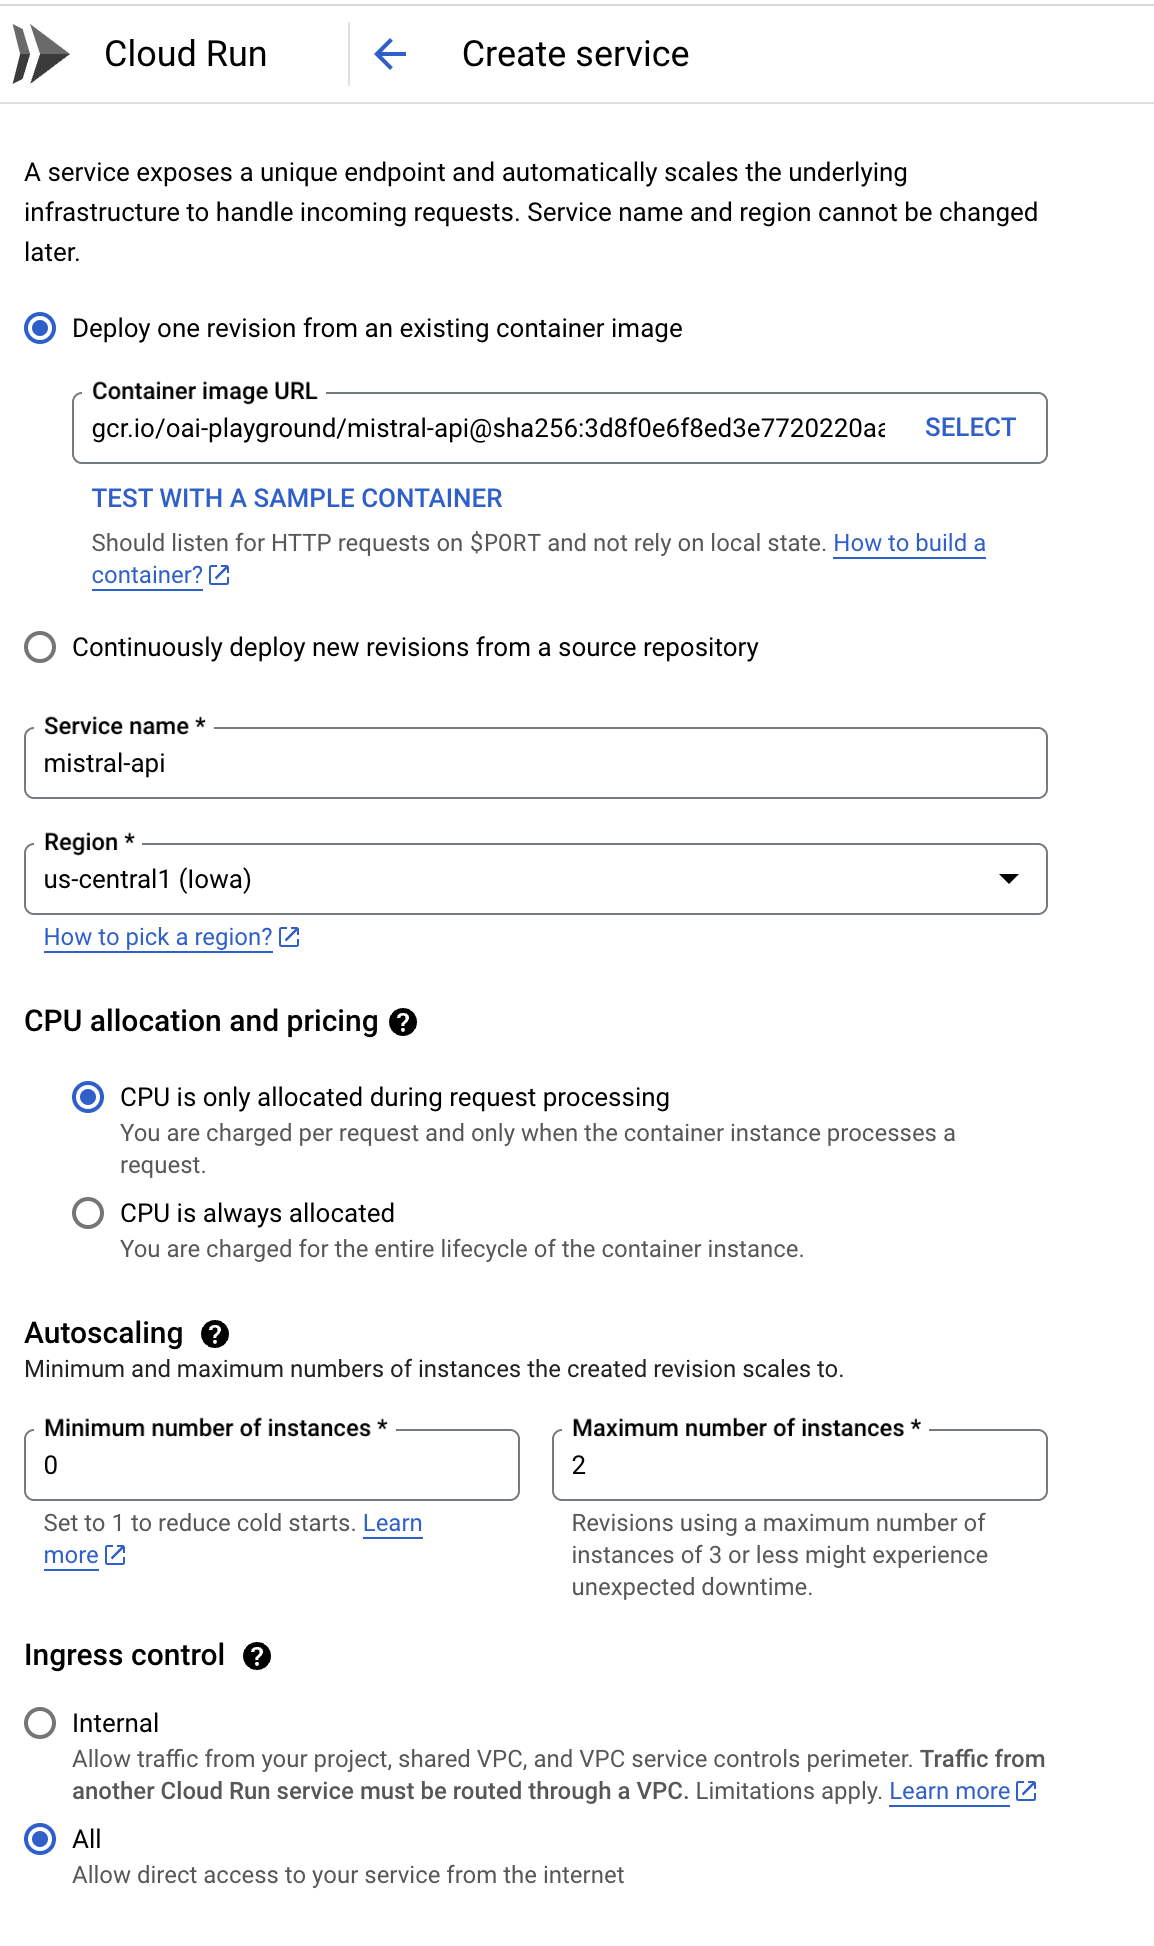
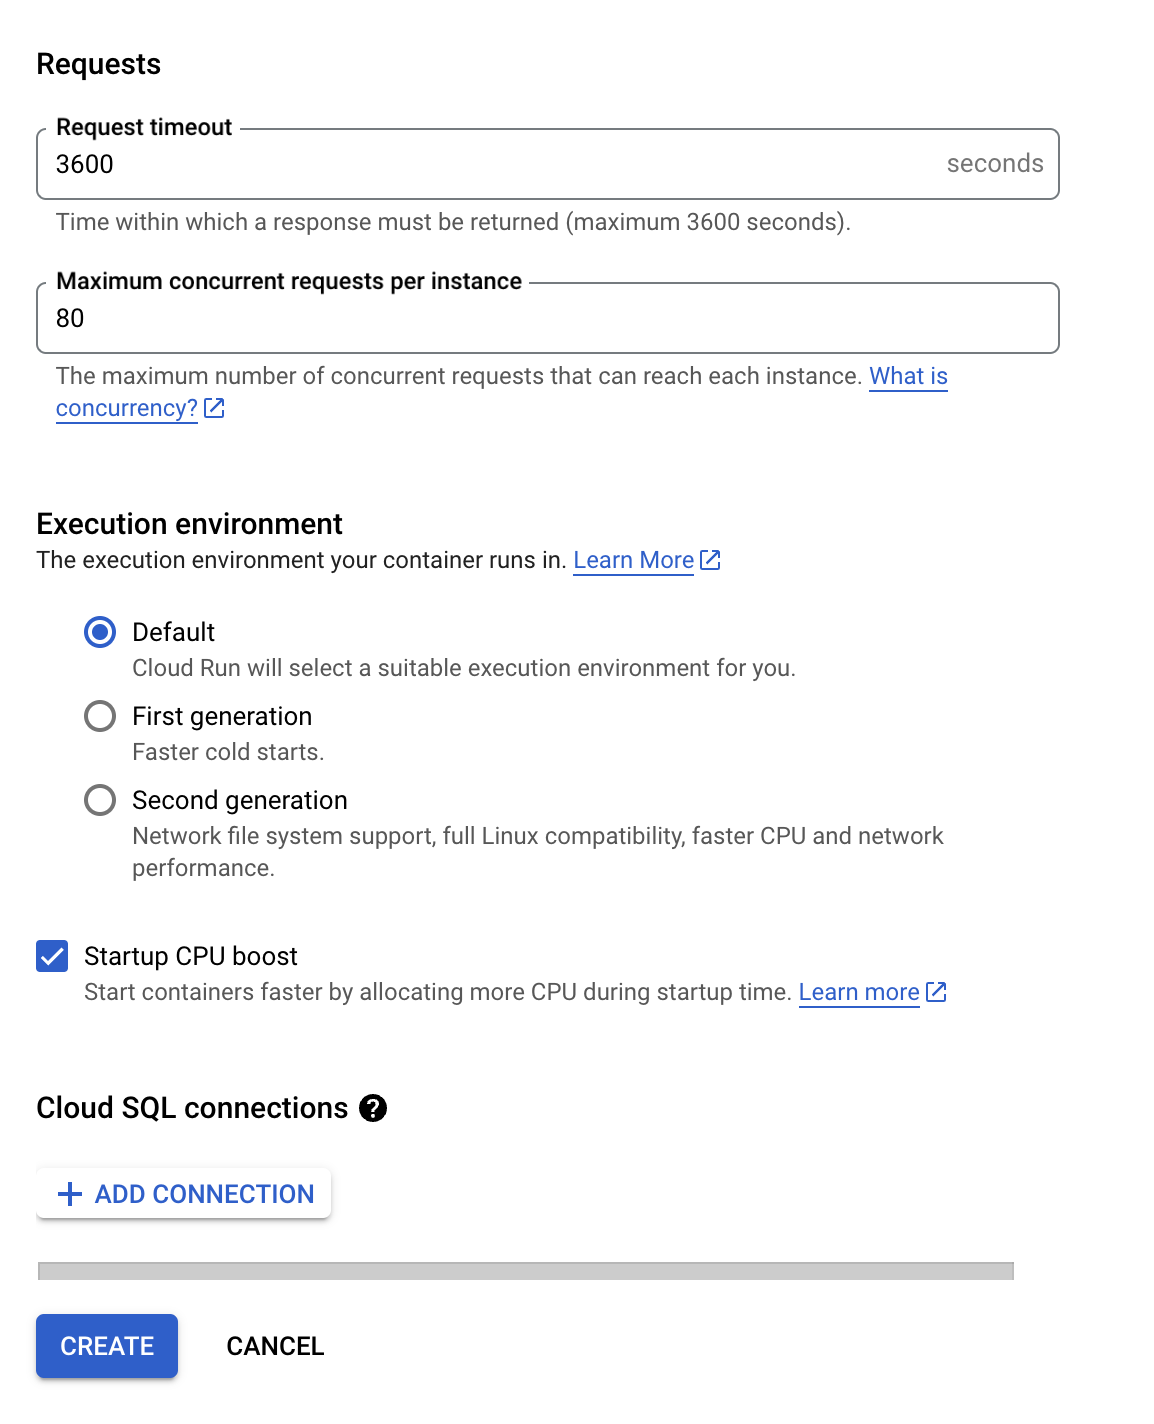
To tackle this challenge, we developed an AI-powered application reviewer that leveraged the capabilities of the Mistral AI model. This tool was designed to analyze candidate responses, provide insights, ratings, and recommendations for each applicant, enabling us to quickly identify the most qualified candidates.

Checkout the Github: https://github.com/sauravpanda/applicant-screening

How It Works

  1. Data Preparation: We compiled all the applicant data into a CSV file, ensuring it was ready for processing.

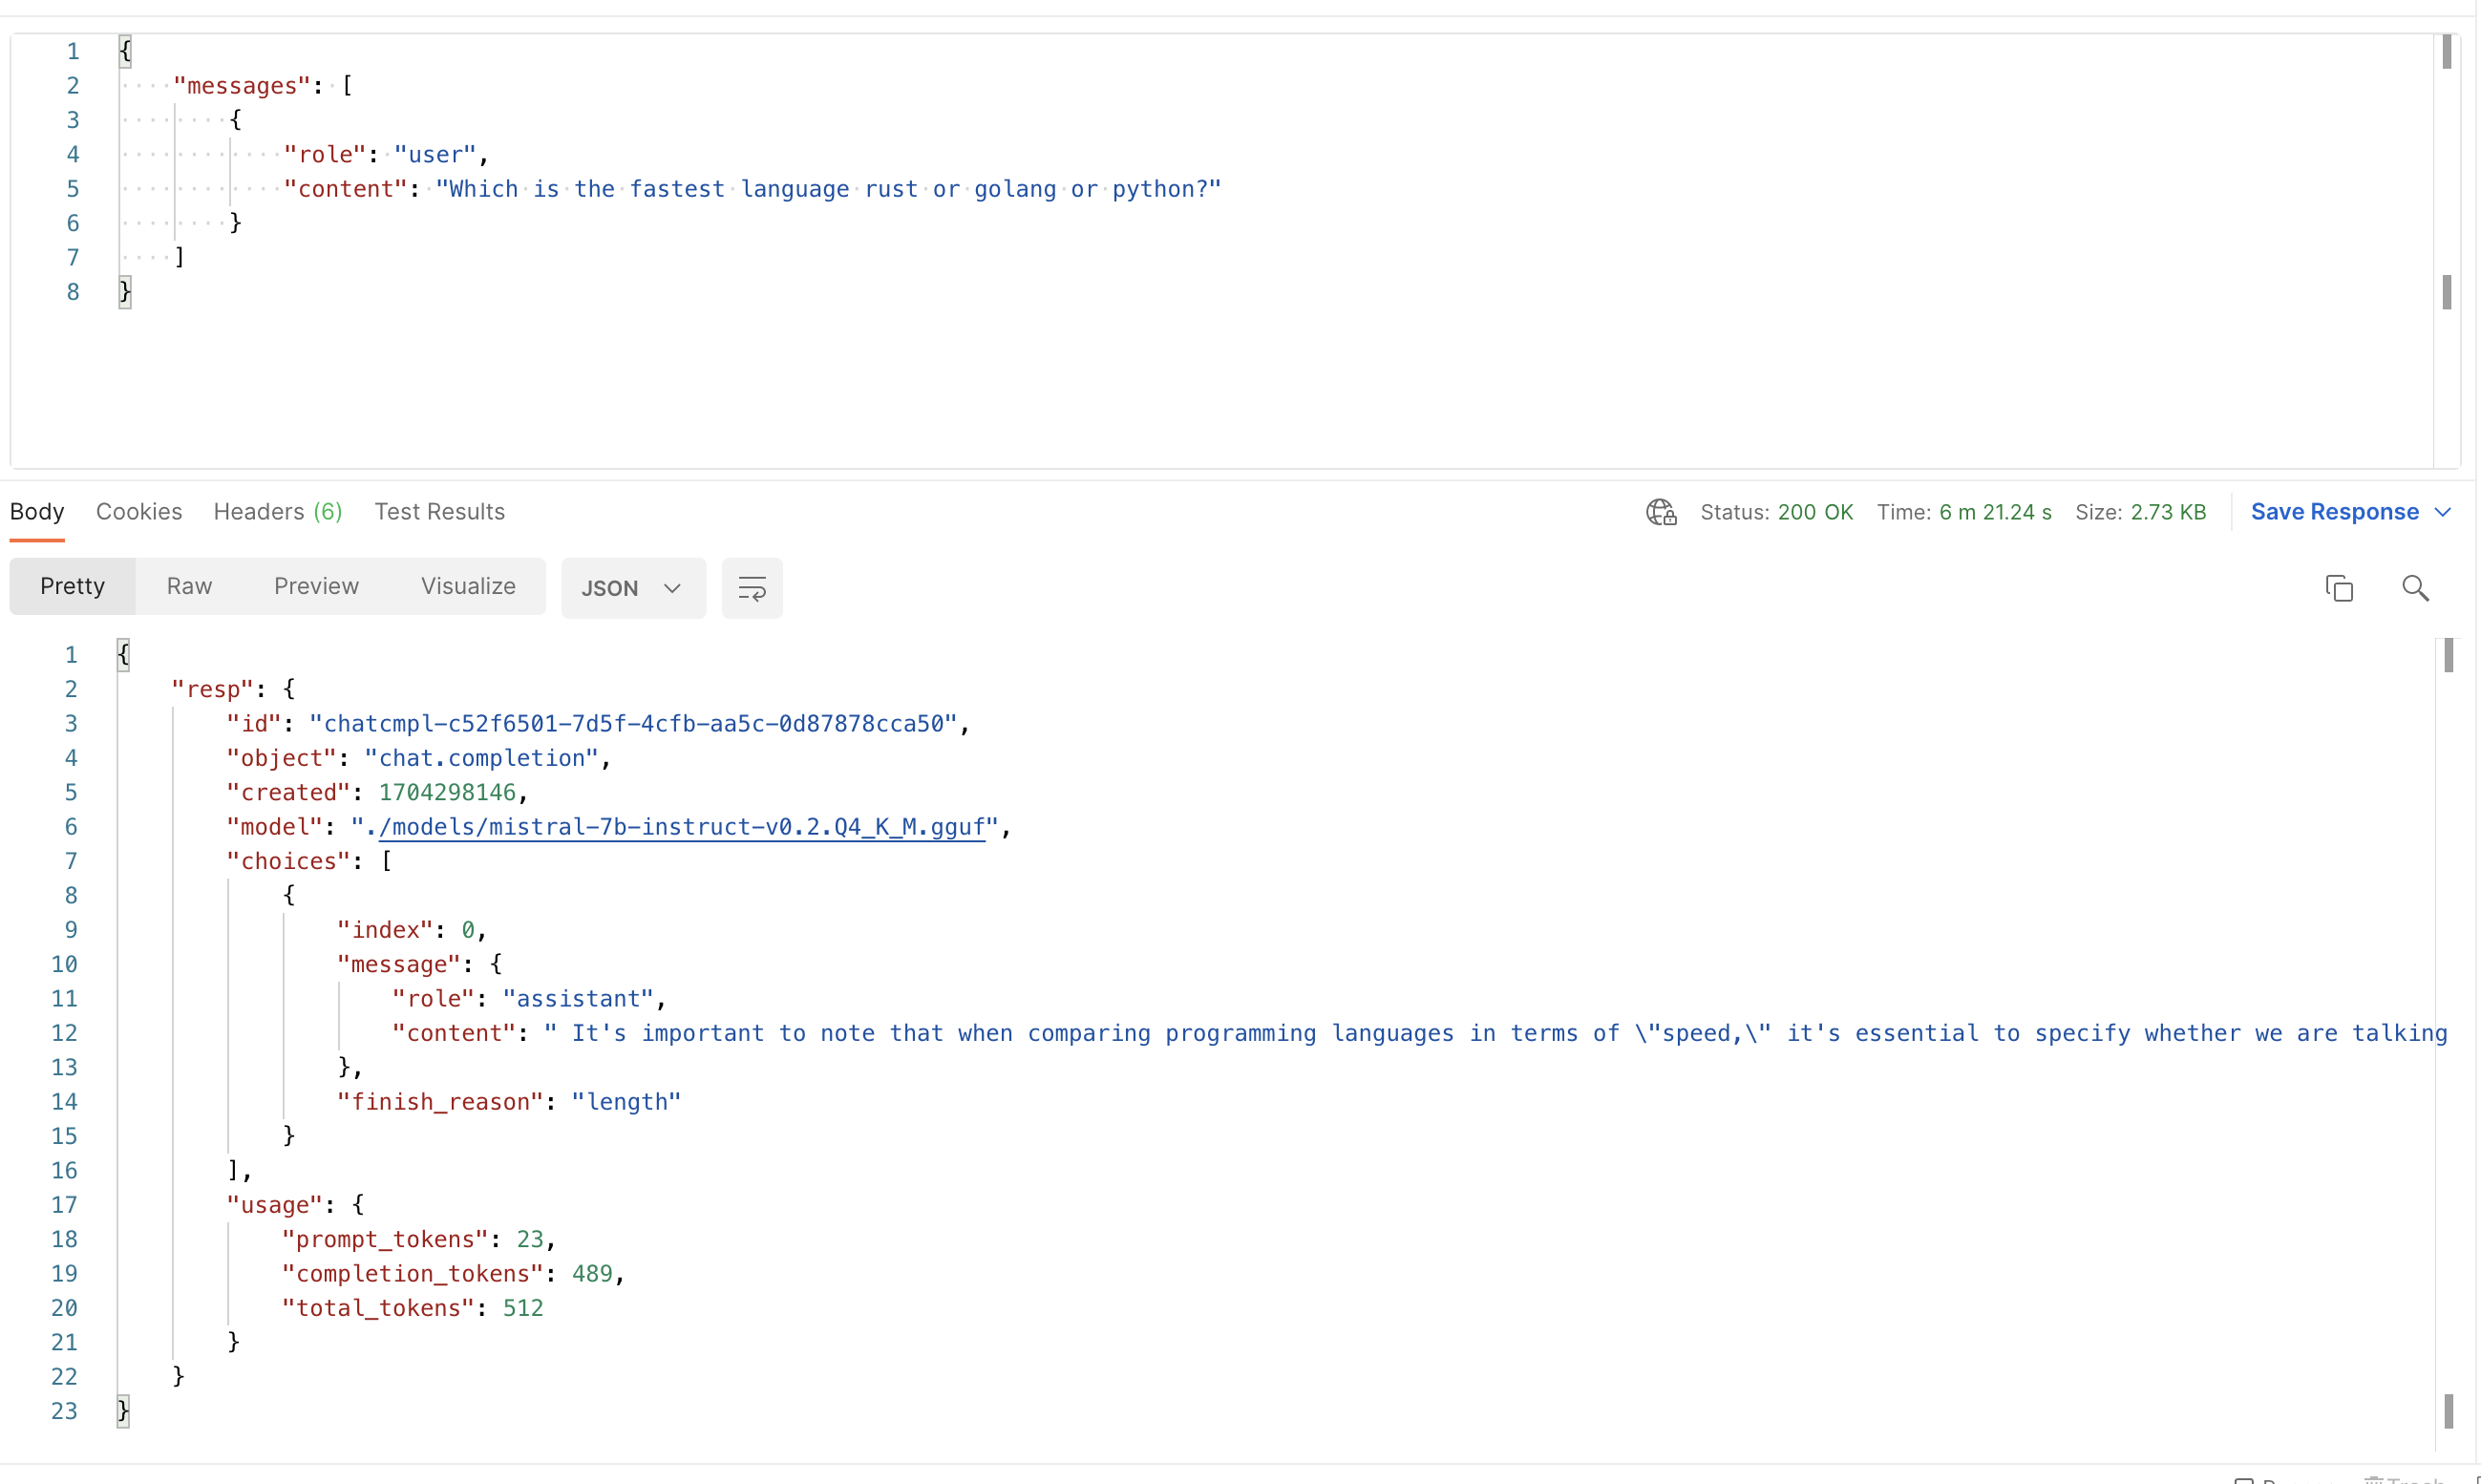
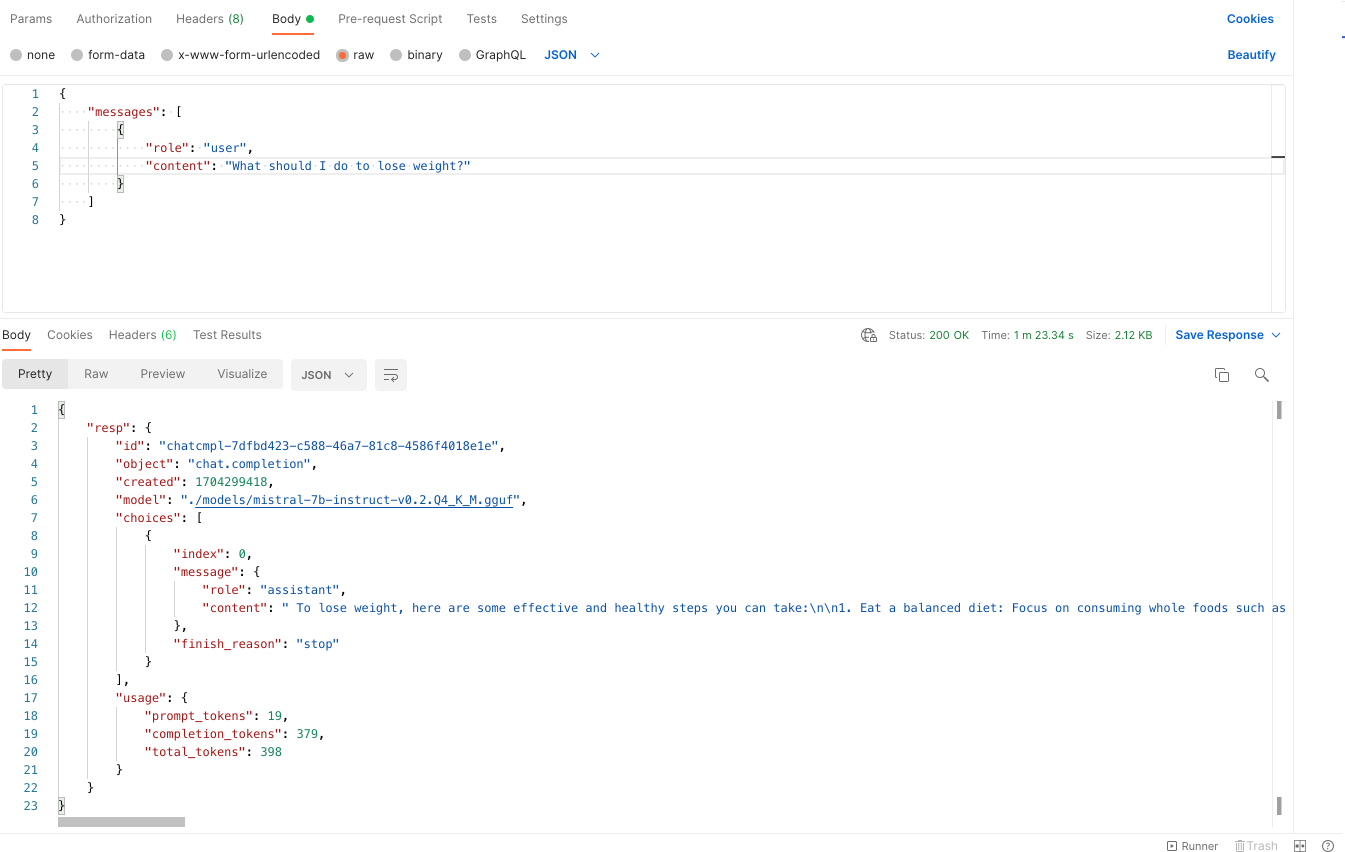
  2. AI Model Integration: Our script utilized the Mistral AI model to analyze each candidate's responses, considering various factors such as their qualifications, experience, and problem-solving abilities.

  3. Customizable Evaluation Criteria: We defined specific evaluation criteria based on the requirements of the QA Engineer role, ensuring that the AI model focused on the most relevant aspects of each application.

  4. Automated Processing: The script processed each application using the Mistral AI model, generating feedback, reviews, interview recommendations, and ratings for each candidate.

  5. Progress Tracking: To monitor the progress of the evaluation process, we integrated the tqdm library, providing us with a visual representation of the task's completion.

  6. Results Consolidation: Finally, the script saved the processed data, including the AI-generated feedback and recommendations, into a new CSV file for our team's review.

  7. Execution Steps:

    • Clone the repository: git clone https://github.com/sauravpanda/applicant-screening.git
    • Install the required packages: pip install pandas litellm tqdm kaizen
    • Update the job post description in jobpost.py.
    • Modify the CONDITIONS variable in the script to set specific evaluation criteria.
    • Prepare your CSV file with applicant data.
    • Run the script: python main.py
    • When prompted, enter the name of your CSV file (with or without the .csv extension).

The script will process the applications and save the results in a new CSV file prefixed with "updated_". Additionally, it will provide a summary of the processing, including the number of applicants processed and token usage statistics.

The Impact: Efficient Candidate Evaluation and Time Savings

By leveraging the power of AI, we were able to significantly streamline the candidate evaluation process. Instead of spending countless hours manually reviewing each application, our AI-powered tool allowed us to quickly identify the top 20 candidates we were interested in, based on the AI's recommendations and ratings.

This innovative approach saved us a tremendous amount of time and enabled us to evaluate candidates more objectively and consistently. The AI model's ability to analyze responses and provide insights helped us assess candidates on different subjective criteria, ensuring a fair and comprehensive evaluation process.

Moving Forward: Embracing AI in Hiring Processes

The success of our AI-powered application reviewer has highlighted the immense potential of integrating AI technologies into hiring processes. As we continue to grow and attract a larger pool of applicants, we plan to further refine and expand our AI-driven approach, ensuring that we can consistently identify top talent while maintaining efficiency and objectivity.

By embracing the power of AI, we are not only streamlining our hiring processes but also positioning ourselves as an innovative and forward-thinking company that values technological advancements and their practical applications.

· 4 min read
Saurav Gopinath Panda

Ahoy, tech enthusiasts and digital buccaneers! Today, we're embarking on a thrilling adventure across the vast oceans of artificial intelligence with our trusty ship, the "Mistral-Docker-API." So, grab your digital compasses and set sail with me as we navigate through the exciting world of deploying AI models using Docker, and eventually docking at the shores of Google Cloud Run.

The Treasure Map: Setting Up Your Ship

Before we hoist the sails, every good pirate needs a map. In our case, it's the README.MD of the mistral-docker-api. This map doesn't lead to buried treasure, but to something even better: deploying the GGUF Mistral model as a container using Docker.

First things first, you need to download the model and store it in your models/ folder. Imagine this model as the secret code to an ancient treasure. You can find this precious artifact at Hugging Face, a place even more mysterious than the Bermuda Triangle!

Once you've got your model, named something like models/mistral-7b-instruct-v0.2.Q4_K_M.gguf, you're ready to build your Docker image. Think of this as building your ship. Run docker build . --tag mistral-api in your command line, and voilà, your ship is ready!

But hey, if you're feeling a bit lazy, like a pirate lounging on the deck, you can just pull the pre-built image using docker pull cloudcodeai/mistral-quantized-api. Then, run it with a simple command: docker run -p 8000:8000 mistral-api. And there you go, your ship is not only built but also sailing!

Here is the link to the treasure map if you are feeling adventurous: 🏴‍☠️ Treasure

The Mystical Inference at the /infer Endpoint

Now, let's talk about the magic happening at the /infer endpoint. It's like finding a talking parrot that can answer any question. You send a message asking, "What's the value of pi?" and the parrot squawks back with an answer so detailed, you'd think it swallowed a math textbook!

But this isn't just any parrot; it's a customizable one! You can tweak its responses with parameters like temperature, top_p, and even max_tokens. It's like teaching your parrot new tricks to impress your pirate friends.

Anchoring at Google Cloud Run

Now, let's talk about docking this ship at Google Cloud Run. Why? Because even pirates need a break from the high seas, and Google Cloud Run is like the perfect tropical island for our container ship.

  1. Prepare Your Container Image: Make sure your Docker image is ready and tested. It's like making sure your ship has no leaks.

  2. Push to Container Registry: Upload your Docker image to Google Container Registry. It's like storing your ship in a safe harbor. If you are lost, worry not, here is our new north start Perplexity AI to guide you!

  3. Create a New Service in Cloud Run: Navigate to Google Cloud Run and create a new service. Choose the image you just pushed to the registry. It's like telling the harbor master where your ship is.

  4. Configure Your Service: Set memory as 32GB, CPU as 8v, and other settings as shown in the map below. It's like stocking up on supplies and making sure your cannons are ready for action.

Cloud Run Configuration 1 Cloud Run Configuration 2 Cloud Run Configuration 3

  1. Deploy and Conquer: Hit deploy and watch as your service goes live. Your API is now sailing on the high clouds, ready to answer queries from all over the world.

  2. Access Your Service: Use the URL provided by Cloud Run to access your service. It's like having a secret map to your hidden cove.

And there you have it, mateys! You've successfully navigated the treacherous waters of AI and Docker, and found a safe harbor in Google Cloud Run. Now, go forth and explore this new world, full of possibilities and adventures. And remember, in the vast sea of technology, there's always more to discover and conquer. Arrr! 🏴‍☠️💻🌊

View From the Analytical Lighthouse

Captain, its an miracle but a slow one!

Our mistral api ship is responding to us but being tiny in such a vast ocean, its responses are pretty slow.

During the first call, it takes 5-6 mins to reply to our input and provide a 400 token long response.

But once its on, it take 1-2 mins to response to our other calls. Hera are the samples.

Cold Start

Cold Start

Warm Start

Warm Start

Future Plans

  • We plan to make our ship more lean and efficient and make it respond faster.
  • We want to experiment whats the idea resources to provide so that we can sail multiple ships in the ocean.

· 4 min read
Shreyash Gupta

OpenAI's ChatGPT is a powerful language model capable of generating human-like text. It excels at engaging in open-ended conversations and can respond to various topics. While this versatility is one of ChatGPT's strengths, it can also pose a challenge in specific contexts. Suppose you're deploying ChatGPT as a chatbot in a particular role, such as an insurance agent or customer service representative. In that case, you'll want it to stay on topic and avoid discussing unrelated matters. So, how can you guide ChatGPT to maintain focus on a single subject?

Before we delve into the specifics, let's look at a few techniques for shaping ChatGPT's behavior for your project.:

  1. Prompt Engineering: This involves meticulously crafting the input prompts to guide the model's responses. By adjusting the prompt, you can direct the model to generate outputs in a certain way without additional training.

  2. Fine-Tuning: In this approach, the model is trained further on a specific dataset after it has been pre-trained. This allows the model to adapt better to the style and context of your particular use case.

  3. Using OpenAI’s GPT Builder: Leverage OpenAI’s GPT Builder for a more customizable language model tailored to your needs.

These techniques form the foundation for shaping the behavior of ChatGPT. However, we need a more focused strategy when it comes to keeping the model on a single subject, especially in a role-specific chatbot scenario.

The Strategy: Setting Boundaries and Reinforcing Instructions

Let's explore a simple yet effective approach to achieve this by using Artificial User Messages to provide additional instructions to guide the model's behavior by injecting artificial user messages into the conversation. These messages can be inserted at any point in the conversation to nudge the model gently in a particular direction.

Keeping ChatGPT focused on a single subject is carefully crafting the conversation and consistently reinforcing the chatbot's role and scope.

Here's how to do it:

Step 1: Set the Stage

First, set the temperature and top_p parameters to 0 in the API call. This makes the model's responses more deterministic, keeping it in line with your instructions.

Next, provide the role-specific instructions in the 'system' role message

messages = [
{
"role": "system",
"content": 'You are a clever, funny, and friendly insurance agent \
focused on making a sale. Do not answer requests or questions not \
related to it directly.'
},
{"role": "user", "content": prompt_value},
]

Step 2: Reinforce the Instructions

ChatGPT sometimes tends to "forget" the instructions in the 'system' role. To reinforce these instructions, include them in the first 'user' message as well.

reinforcing_prompt = {
"role": "user",
"content": 'You are a clever, funny, and friendly insurance agent \
focused on making a sale. Do not answer requests or questions not \
related to it directly.'
}
messages.insert(1, reinforcing_prompt)

Step 3: Inject Artificial User Messages

Even with the above steps, the model may occasionally drift off-topic. To counter this, we can add an artificial 'user' role message before every new message the actual user sends. This message acts as a gentle reminder for the model to stay on track.

artificial_prompt = {
"role": "user",
"content": ''Remember to not answer requests or questions not \
related directly to making an insurance policy sale.'
}
messages.insert(2, artificial_prompt)

This message should be invisible to the real user and should not be included in the conversation history sent to OpenAI for the rest of the conversation, as it has already served its purpose.

Conclusion

By combining the fundamental techniques of shaping ChatGPT's behavior with strategic use of system and user messages, you can effectively guide the model to stay within defined boundaries. This approach is beneficial when deploying ChatGPT in scenarios where the conversation needs to remain centered around a specific subject, such as customer service, sales, or any role-specific chatbot. With these techniques in your toolbox, you can harness the power of ChatGPT and customize its behavior to suit your specific needs.

· 2 min read
Saurav Gopinath Panda

In the ever-evolving landscape of technology, the integration of machine learning models into web services has become increasingly popular. One such integration involves OpenAI's Whisper, an automatic speech recognition system, deployed as an API using Flask, a lightweight Python web framework. This blog post will guide you through setting up a Whisper API service and implementing basic analytics to monitor its usage.

Introduction to Whisper and Flask

Whisper, developed by OpenAI, is a powerful tool for transcribing audio. When combined with Flask, a versatile and easy-to-use web framework, it becomes accessible as an API, allowing users to transcribe audio files through simple HTTP requests.

Setting Up the Environment

Before diving into the code, ensure you have Python installed on your system along with Flask and Whisper. You'll also need FFmpeg for audio processing. Installation instructions for these dependencies vary based on your operating system, so refer to the respective documentation for guidance.

You can find all the code here: https://github.com/sauravpanda/whisper-service

Crafting the API with Flask

The core of our service is a Flask application. Flask excels in creating RESTful APIs with minimal setup. Our application will have two primary endpoints:

/transcribe: Accepts audio files and returns their transcriptions.

The /transcribe endpoint handles the core functionality. It receives an audio file, processes it using Whisper, and returns the transcription. Error handling is crucial here to manage files that are either corrupt or in an unsupported format.

Running and Testing the API

With the Flask application ready, running it is as simple as executing the script. You can test the API using tools like curl or Postman by sending POST requests to the /transcribe endpoint with an audio file.

Conclusion

Deploying Whisper with Flask offers a glimpse into the potential of integrating advanced machine learning models into web services. While our setup is relatively basic, it lays the groundwork for more sophisticated applications to run locally on your systems.